Tag Archives: skills

Bacon Lard

I’m nearly out of bacon lard and need to make some more, so I figured it was a opportune time to write a tutorial on just how I do that.

Just a word about using lard: if you are vegetarian or subscribe to the low-fat-everything-is-healthy-for-you way of eating, then this is not a post for you. If you’d like to learn more about the philosophy I believe when it comes to using saturated fats for our family’s diet, read this article, it sums up my beliefs quite well.

Now, I’ll be the first to say that the lard which comes from processed bacon is not the healthiest fat on the planet. But I use it because 1.) saturated fats are not the evil fats they have been made out to be, and 2.) (most importantly) it’s free! As with almost everything in this world, moderation is key. I suppose it would be more healthy if we used healthier bacon (yes, there is such a thing.) But we haven’t made that switch yet. One of these days…

So, what is bacon lard anyway, and how do you make it?

I’m so glad you asked. ‘Cause I’m gonna tell you. 🙂

Whenever you make bacon, there’s all that grease left over, right? I know some people dump that grease into a grease pot and leave it on the counter and use it just like that. But, my modern food handling mind just can’t get past that. And I know people who simply pour their bacon grease in a container and keep it in the fridge and use it as needed. I don’t like that either because then you have all those little burned bits of bacon fond mixed in with the grease and an overpowering bacon flavor. I know, I know, there are those of you asking, “What’s wrong with that???”(My Hubby is included in your ranks, for sure!) But depending on what I’m using it for, I don’t want it to taste so much like bacon. And those little burned bits just make the grease look “dirty”. Turning your bacon grease into bacon “lard” makes it nice and clean and less bacony in flavor. It is a long, but very simple process. Most of the time you’re not doing anything but waiting for the grease to harden.

Ok, you you’ve just made your bacon and you want to clean the pan. What do you do with the grease? Well, you simply pour it into a container and put it in the fridge.

But wait! Didn’t I just say I don’t like doing that? No, I said I don’t like using that grease as-is. I do something extra with the grease to make it more like lard.

First of all, I like to strain my grease through a paper towel as I put it in the jar.

20151007_105634_resized

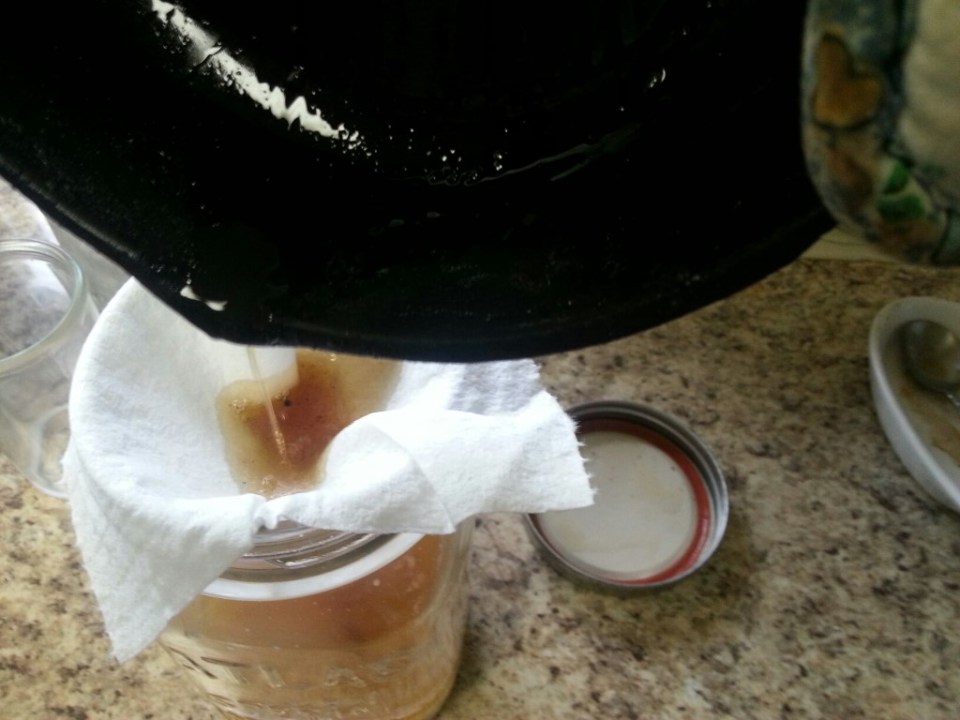
This step is not totally necessary, but makes the cleaning process go faster.

Cleaning process? You “clean” your lard?

Yep. Yep I do.

20151007_105726_resized

Anyway, once your container is full (or nearly so – this make take a while depending on how often you eat bacon), simply melt your grease…

20151113_105316_resized

Yes, that’s bacon grease – with all the dirty bits still inside.

…I use the microwave.

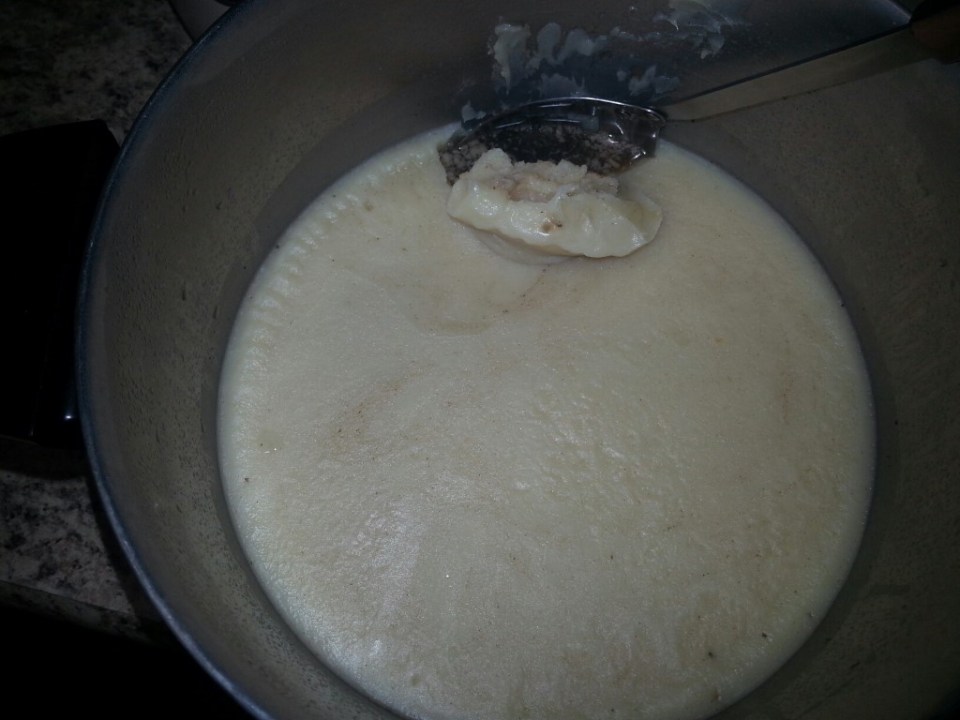
Then you add the grease and about the same amount of water into a pot and put it on the stove to boil.

20151113_110332_resized

Once it just starts to boil, turn it off and set it aside. You can put in some cold water to help it cool off faster. As I’m sure you know, oil and water do not mix. The lard (oil) will float to the top of the water, and the impurities which were in the grease (the dirty bits) will sink or be washed out by the water.

The next step is where the length comes in. You have to let this oil and water concoction cool enough that the fat will solidify. If the temps are cold enough outside, I often secure the lid on the pot, and put it outside in the cold. This makes the process go faster. However, if the temps outside are too high, I let it cool to room temperature, then stick it in the fridge, usually overnight.

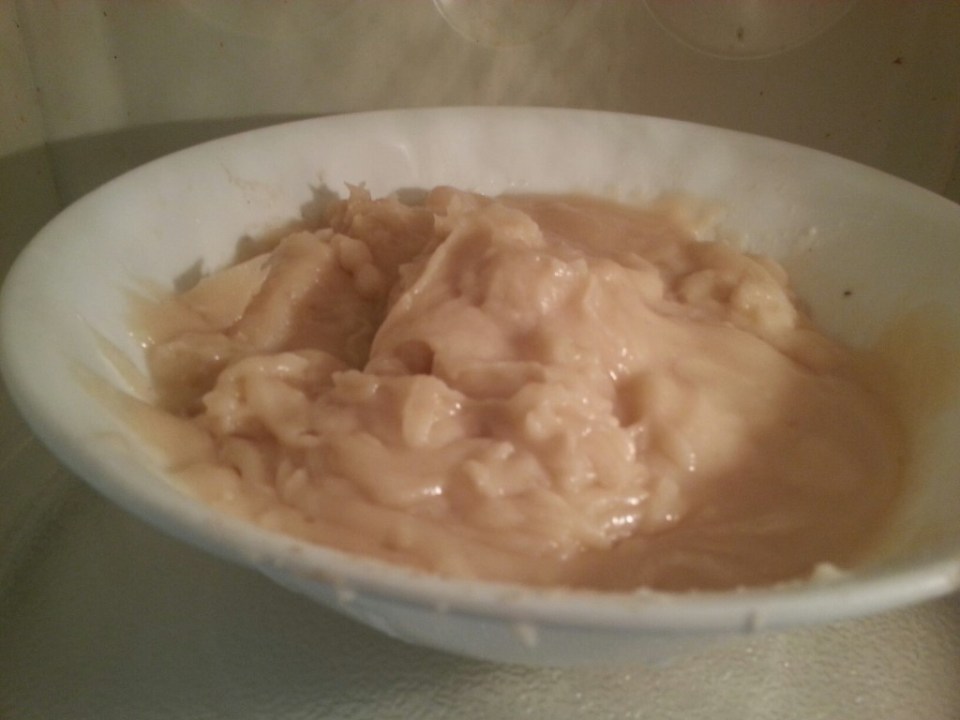
Once the fat has solidified, scoop it out with a slotted spoon and put it into a bowl.

20151113_214701_resized

scoopable-solid again

20151113_214751_resized

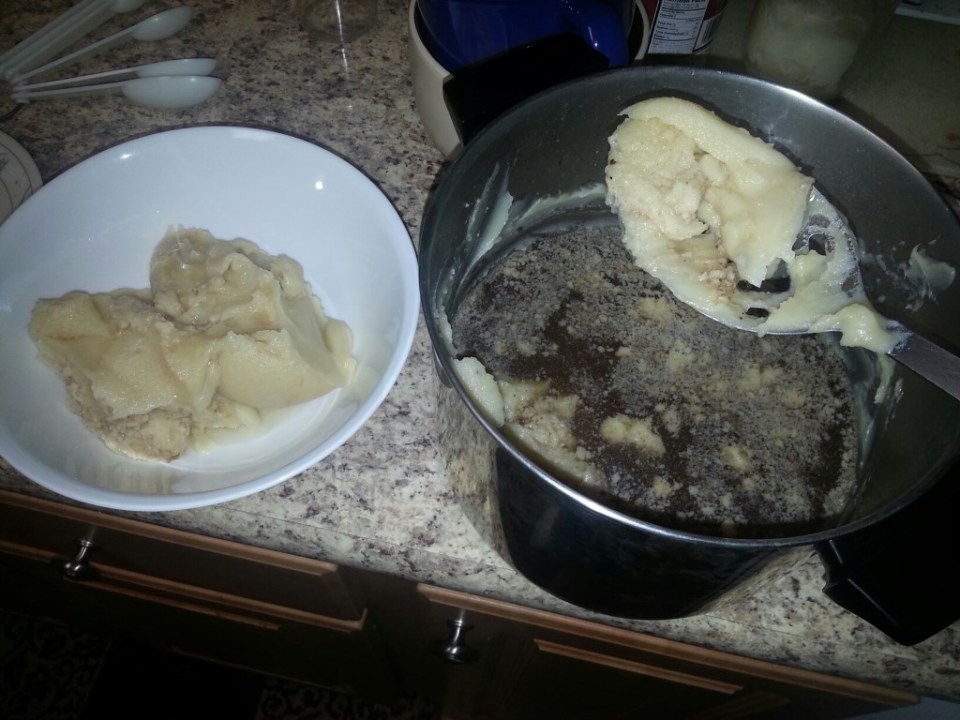
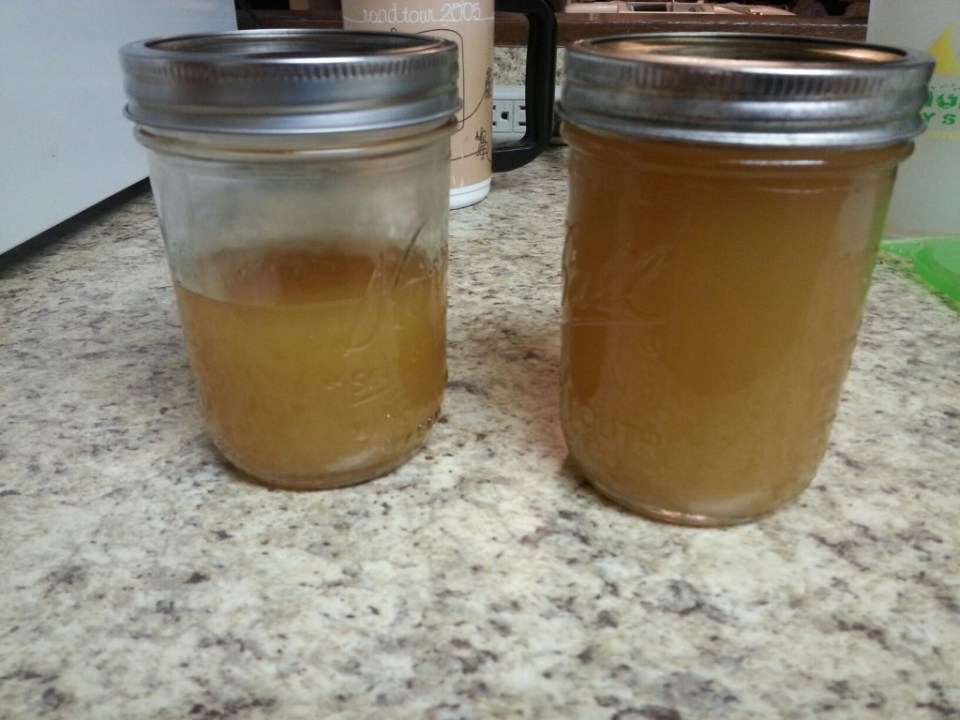
Look how dirty the water is

Once you get all the chunks of fat out (I use a small mesh strainer to get all the little bits), you’ll be left with dirty water which you can pour down the drain.

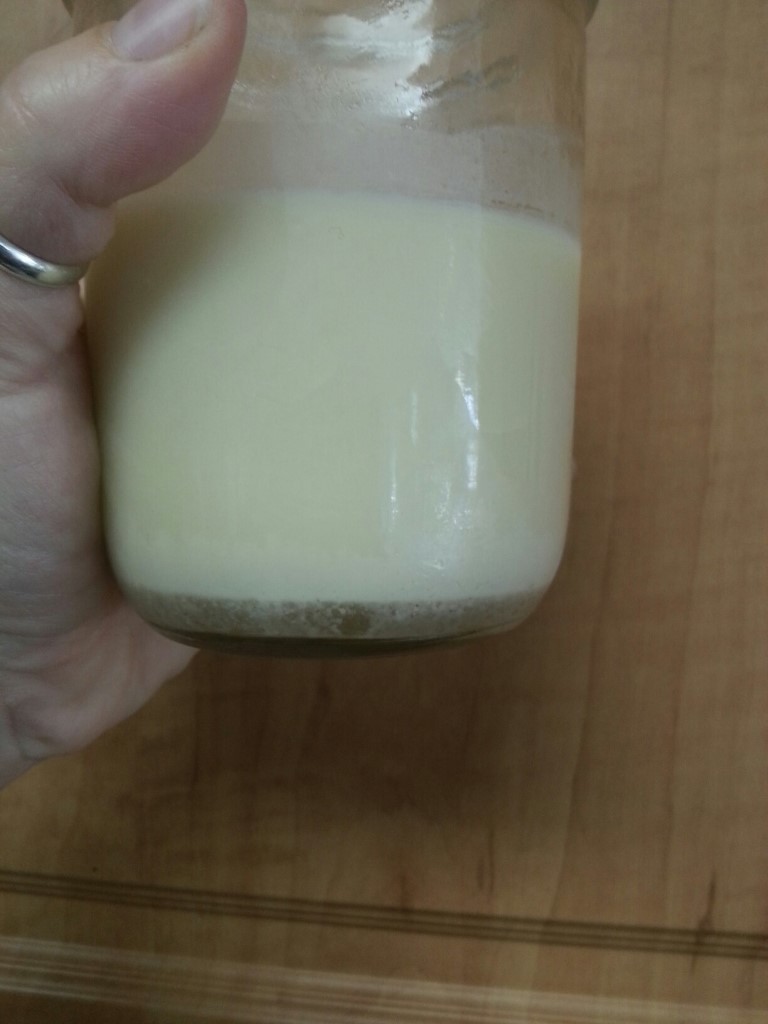
I usually “wash” the grease a couple more times by following the above steps, until the water is clear underneath the solidified fat.
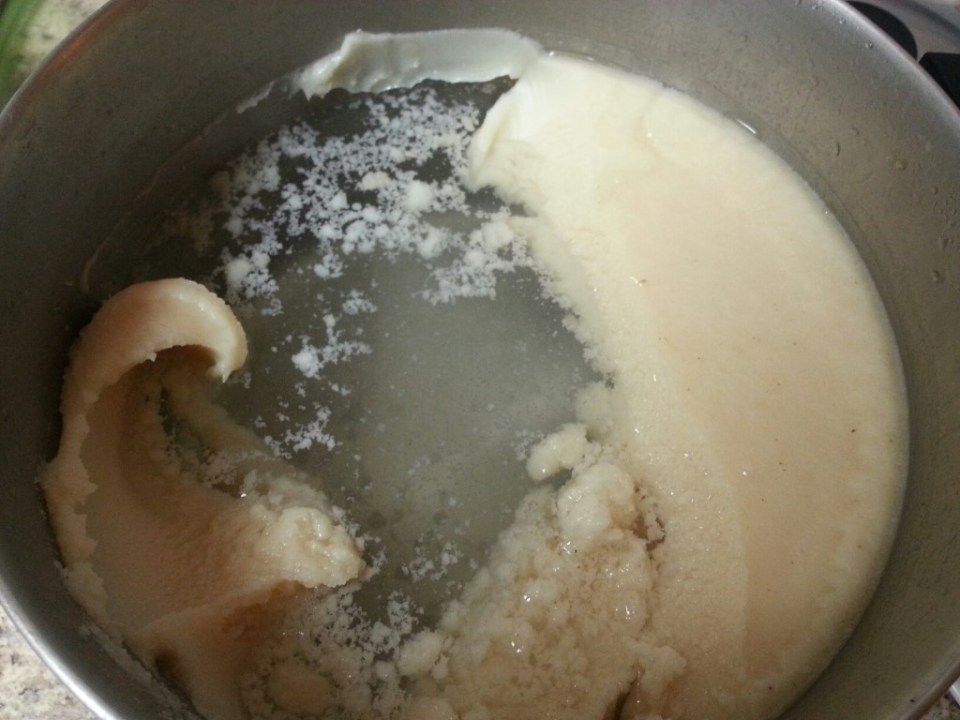
20151114_181548_resized

Clear water

But you could certainly skip the subsequent washings if you wanted. I find that by filtering the grease through a paper towel first, it takes fewer “washings” to get the lard as clean as I like it.

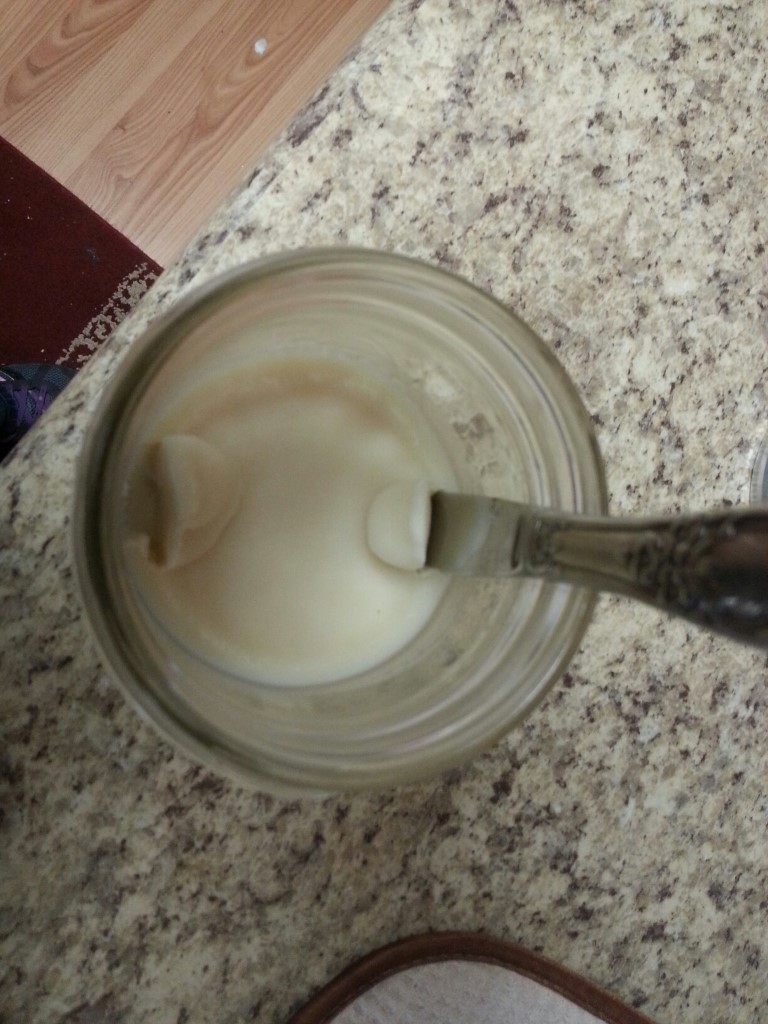
Once it’s as clean as you want it, you scoop the grease into a bowl with a slotted spoon or mesh strainer (try to let as much water drip from it as possible).

20151114_182121_resized

Clean lard

Melt the lard just until pourable and pour into mason jars*.

20151114_182937_resized

Notice the color change from the first time I microwaved it near the top of the post.

I suppose there’s probably some way to process this so that it is shelf stable. But I have never researched it. I just stick it in the fridge once it’s cooled off a bit (or freezer if I have extra).

Note: once it has solidified, you might find that there is some water in the bottom of the jar.

20151121_121609_resized

If this happens, slide a knife along the glass into the lard in two spots on opposite sides of each other. Then pour the water out one of the holes (the other hole is to allow air into the bottom cavity so the water flows easier.)

20151121_121643_resized

If you prefer, you can heat the grease again so it melts and fills the holes back in.

*I always use wide mouth pint jars because they are the perfect size for our favorite spatula to fit in to scoop out a bit of lard (not an affiliate link – we just really like the style. In fact, we happened to find some at the dollar store!).

So there you have it. Now that your bacon grease has become lard, you can use it in much the same way you do regular lard. I do find it still has a bit of a bacon flavor/odor, but it is only objectionable to use it in things that are naturally bland themselves. I have even made soap with it!

I always feel so frugal when I use my bacon lard. I mean, it is basically free since you’re gonna eat the bacon anyway, right? So now you have something useful to do with the left over grease.

Seamstresses in the making

Why, yes. I do let my nearly-three-year-old play with my sewing pins.

image

Just as I let her sister before her when she was young. And now Princess Girl loves designing.

image

Sewing is a big part of a sustainable lifestyle. When purchased thriftily, buying fabric can be much cheaper than buying ready-made items if you have the know-how. But sewing is so much more useful than making your own clothing from scratch.

image

Mending a blanket.

Being able to repair those things which you already own is a first step toward living sustainably.

And you don’t need to tons of fancy gadgets and gizmos. A simple machine and a rudimentary knowledge of a few techniques will get you a long way. I myself have a rather simple machine.

image

I only ever use a couple of the available settings. But it serves me well.

If you have a machine but learning to use it is a daunting task, find a friend who can help you. (It’s hard to learn sewing from the internet unless you already know how to handle your particular machine since they are all a bit different.) As stated above, you don’t need to know how to use every setting on your machine. You basically just need to know how to thread it, how to load and refill the bobbin, how to do the straight stitch and zig zag stitch, and what the length, width, and tension dials do. You can do an awful lot of sewing with those basic skills. And as you practice more and become more comfortable, you can start learning all the other things your particular machine can do.

image

If you don’t have a sewing machine and can’t afford even a basic one, at least learn how to hand sew. Knowing a few easy stitches can be the difference between repairing that blanket and buying a new one, or paying someone to hem your pants or doing it yourself. And hand sewing is easy to learn from videos on the internet.

And remember, if children can learn to do it, you can, too!

Let’s hear you chime in. Do you think that sewing is an important skill to know? Do you know how? Wanting to learn?

Maridy

“I lift up my eyes to the hills, where does my help come from? My help comes from the Lord, the maker of heaven and earth.” Psalm 121

Christmas sewing

Alright, alright! I’ll admit it.

I’m a fabric junky.

There’s a picture floating around Facebook of fabric being stored oh-so-neatly in a filing cabinet drawer.

Here’s what I said about it.

image

Yes, I actually chuckled when I saw that picture. There’s no way my stash of fabric could ever be that neatly organized. I have too much. It would take 5 whole filing cabinets! The yardages I have are too big. Some of my fabric pieces would nearly fill their own drawer by themselves. Or they are too small.

And yet, I WISH my stash could look like that.

Oh wait. That’s right.

I don’t HAVE a stash!

At least, not here in Oregon.

And not really in Nevada either.

When we moved into our trailer on the homestead last year, I downsized drastically. My “stash” consists of three boxes (albeit two big ones and a medium one). And you know where those three are?

That’s right. They are in Nevada. Awaiting the day when our house is built and I have a sewing area again.

In the mean time, I have a million ideas running around my head of things I want to sew, especially Christmas gifts.

So, I went shopping. I went with one project in mind.

Here’s what I ended up with:

image

I couldn’t help myself. All this fabric was only $15!

Yep, though they are all sheets, it turned out to be about $1 per yard. Pretty good deal, I’d say.

How, you ask?

Thrift store.

And not the overpriced big name ones either. A small, locally owned store in our neighborhood. The type of store where the proprietor is willing to give you a deal on things because she knows that money earned is better than items sitting on the shelf.

So what am I going to make with all that fabric? Well, I can’t tell you. Most of it is for Christmas gifts, afterall. And I know the intended recipients read this blog.

image

However, I can say that the purple fleece will become three matching pairs of pajama pants for the girls and I, to be given on Christmas eve. I’ve been wanting matching jammies for us for a long time and almost bought a set online the other day. But couldn’t quite shell out the $32 + shipping it would have cost. And buying fabric from a traditional fabric store wouldn’t cost much less.

So, $5 and a little work, and I’ve got them.

Thrifting for the win!

What about you? How do you save money when it comes to Christmas gifts? Do you make your own?

Maridy

“I lift up my eyes to the hills, where does my help come from? My help comes from the Lord, the maker of heaven and earth.” Psalm 121

Garden Journal

I think I’ve mentioned it before, but I keep a garden journal.

It’s a journal which helps me remember when I planted, how long it took for things to germinate and produce, how well things did, etc.
image

I started my first journal in 2009 and finished it in 2013 (I didn’t garden in 2014 since we moved twice that summer). I started a new book in February of this year. I usually use whatever blank journal I have on hand. (And since I’m a journaler by nature, I always have extras laying around.)
image

I don’t like pre-printed journals which have questions for you to answer since I find them too confining. I want to write about what I want to write about. Or more than likely, they don’t leave me enough space to write. I like to use a conversational voice when I write and tend to write a lot (have you noticed? 😉
image

So even though I just started a new joirnal this year and it will take me a while to fill it, I bought a new one yesterday at Michaels craft store.

I just couldn’t pass it up.

image

Look how incredibly perfect it is for gardening and farming and all sorts of homesteaderly stuff! (Yes, I just made up a new word!) In fact, I’m wondering how I can use it sooner, because I don’t want to wait till my current journal is finished. 🙂

image

I know a couple of homesteading friends who might just end up with one for Christmas.

And I have a 50% off coupon!

I’m thinking I see a trip to Michaels in my near future.

How about you? How do you keep track of all your homesteading endeavors?

Maridy

“I lift up my eyes to the hills, where does my help come from? My help comes from the Lord, the maker of heaven and earth.” Psalm 121

Homemade Laundry Soap

Soooo….I’m a horrible blogger. I made about a year’s worth of laundry soap a couple days ago. I meant to take pictures so I could post step by step photos. The last time I intended to do a DIY tutorial, I ended up in the Emergency Room. This time, I got half way into the process and forgot to take pictures.

I’m horrible, I tell ya!

But enough about me. Let’s learn how easy (and cheap!) it is to make your own laundry soap.

There are about a bajillion different diy laundry soap recipes out there. I’ve been using this particular recipe on our clothes for at least two years now. Why did I choose this one?

Because it was the one my cousin gave me back before I really got into this diy journey.

image

And because it’s simple – only 3 ingredients besides water. Washing soda, Borax, and Fels-Naptha soap (all can be found in the laundry isle of most large grocery stores).

That’s it.

Truly.

I know, right?

And the process is just as simple.

Step #1: put 4 cups hot water in a pot.

Step #2: grate the Fels-Naptha into the water.

image

Step #3: stir and then gently (gently!) boil until the soap is all melted. Don’t vigorously boil unless you don’t mind suds all over your kitchen.

image

(And that’s all the pictures I got till the next day.)

Step #4: add in 1/2 cup borax and 1 cup washing soda (this is not baking soda – there’s a difference!) to the pot and stir till dissolved. (Note: this time around I doubled the amount of borax and washing soda to see if there is any difference in the long run.)

Step #5: fill a 5 gallon bucket half full with hot water. Pour the soap contents from the pot into the bucket and stir well.
Step #6: fill the rest of the bucket with hot water, stir and set aside until the next day to let it set up.

image

See, told you it would set up.

Step #7: now stir, stir, stir! It would be awesome to have one of those paint stirring attachments for a power drill. That would make this part super easy. I thought we had one of those somewhere. Hmmmm… it’s probably still in our shed back on the homestead. Since I didn’t have one of those stirrer thingies, I just used a big slotted spoon.

image

And eventually I even just used my hand to reach in and mush up all the gloppy clumps. It was strangely satisfying.

image

Step #8: fill a container such as an old laundry soap dispenser or large jar half full with your soap, fill the rest of the way with water and shake. Use approximately 1/4 cup for a front loading washer (you lucky folks) and about 3/4 cup for a top loader. Shake with each use.

That’s it. See, told ya it was simple. And yes, with 4 people in our family and a top loading washer, this amount of soap will last us approximately a year.

So, how does it work? You know, I have to be honest, it’s not the greatest on stains. But it does a good job keeping things generally clean.

It is gentle enough that we used it on Flower Girl’s clothes when she was a baby and suffering from bad eczema and it did not irritate her condition.

It does tend to be clumpy when I pour it, but then, I’ve never taken the time to really, really stir it up well either. I’m sure that would make a huge difference.

As we travel on our journey toward all natural products, I like that the majority of ingredients in this laundry soap are all natural. I did however, read the ingredients on the Fels-Naptha soap and it does have some perfumes and unpronounceables. It’s diluted quite a bit in this recipe, so I went ahead and used it this time. I think by the time we need another batch, I will try to find a more natural soap. I have heard you can use Ivory soap in place of the Fels-Naptha. I will have to look into it more.

But, I’ve got a year to do it. 😉

Have you ever made your own laundry soap? What’s your favorite recipe?

Maridy

“I lift up my eyes to the hills, where does my help come from? My help comes from the Lord, the maker of heaven and earth.” Psalm 121

Starbucks, eat your heart out!

First of all, for you subscribers, are you enjoying the old posts? I think I have about 4 more of those scheduled. I hope the info is interesting to you. I felt like this blog started in the middle of the story of our move to the homestead (and then our subsequent move here to Portland). So I wanted to be sure the whole story was here on the blog. Okay, back to our regularly scheduled program:

I think I mentioned before that I have a guilty love of mochas. Starbucks mochas, half sweet, to be specific. Well, today as I was making yogurt (following the super easy instructions from Jill, over at theprairiehomestead.com) I got a hankering for one of those mochas.

Might have something to do with the fact that I had just had to resist the temptation to run into Starbucks on my way home with milk. That little logo sure can get my mouth watering! (Pavlov anyone?) But I resisted because my wallet is near empty and their chocolate syrup is full of questionable ingredients such as highly processed sugars and preservatives.

What’s a girl to do? As I set the milk for the yogurt to heat on the stove, my tastebuds were still craving that creamy bittersweet chocolatey goodness. So, of course, I whipped up my own cafe mocha. Right in my kitchen. Whithout an espresso machine. And full of only nutritious real food. No way!

image

Yes way!
-I started with about 3oz of really strong coffee. It could maybe even be called espresso, it was that strong.
-To that I added about 6oz hot milk (I used the microwave to heat the milk, but you could easily use the stove as well, or steam it if you have an espresso machine).
-About a tablespoon of cocoa makes a rich chocolatey mocha.
-To balance out the choloclate and add depth of flavor, I added about a quarter teaspoon real vanilla.
-For sweetness I added a splash of pure maple syrup. I really don’t know how much. If I had to guess, I’d say probably 2 teaspoons. But I don’t like my mocha very sweet. I just dropped some in, stirred it all up, tasted it, added a bit more, and tasted it again.

Perfection.

Well, it was missing the real whipped cream on top, so I dropped in a dollop of heavy cream. That kicked up the delish factor to as high as it could go without having actual whipped cream on hand (and no patience to make make some).

Who needs to shell out $4 for a drink when you can make an even better version for a fraction of the price right in your own kitchen?

Maridy

“I lift up my eyes to the hills, where does my help come from? My help comes from the LORD, the maker of heaven and earth.” Ps 121:1-2

A “new” way to wind a garden hose

image

Yesterday, I experienced one of those moments that make you say No Way! I was winding the garden hose back into its spot on the ground. It kinda sorta did its own thing and wound into a figure 8 rather than a circle. But here’s the thing,  as it was being put down, I didn’t have to twist or wind the hose to get it to lay flat. In fact, the whole thing laid down with nary a twist in the entirey. Which means, that in theory, when I pull the hose out next time, it shouldn’t twist and coil and kink.

Did I really just discover the secret to un-kinked hoses? Will it unwind with the same ease? Will my gardening life hereafter be blessed with free flowing water?

Have any of you experienced this? Am I really just now discovering this? Is this the “right” way to wind hoses and I’m just now learning about it??? Or was it a total fluke and it won’t make a difference?