Tag Archives: Candlemaking

Daily Life – Days 24 thru 30 – And a Ketchup recipe

Ok, so I know I’m a week behind. There is a reason, and it’s big news, but that is a post all on it’s own. Suffice to say, we’ve been busy, busy, busy the past week. And even though we are still super busy, I actually made ketchup today.

20160224_115415_resized

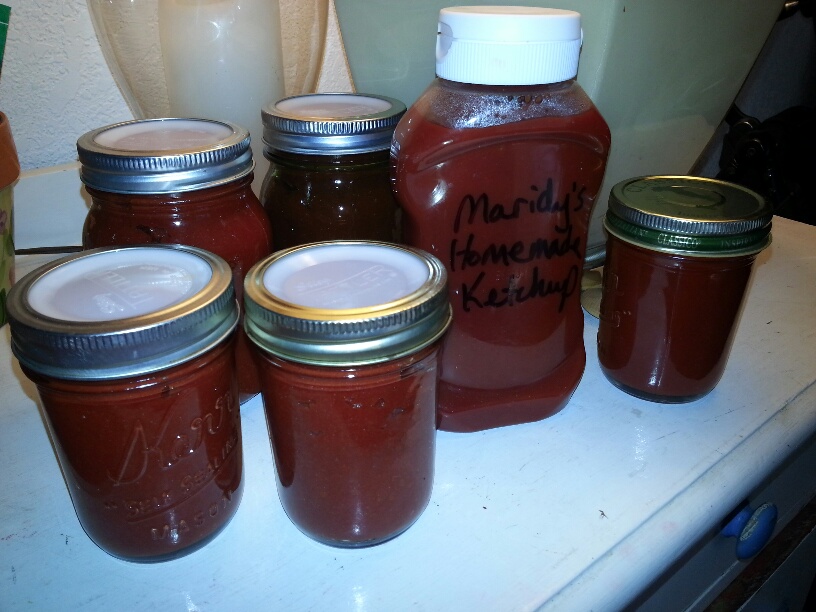
We were completely out, and I hate some of the ingredients in the store bought stuff. This is the second time I’ve ever made ketchup (or catsup if you prefer). This time I wanted to start with tomato paste. By starting with paste, it takes a lot of the time out of the process because you don’t have to simmer for so long.

I got three pints, which I processed, and another pint + a bit which went in the fridge and freezer.

I’m not sure how I like it yet. It doesn’t taste quite like ketchup that I’m used to. I have only made this recipe completely from scratch before, never from paste, so that may alter the taste. And I know from my previous attempt years ago that the taste does improve over time.

So I give you the recipe without my full endorsement since I can’t say I really like it yet. So take it as you will. 🙂

Tomato Paste Ketchup (4 pints)

  • 8 – 6oz cans of tomato paste
  • 2 Tbl onion powder
  • 3/4 cup Honey (or sweetener of your choice)
  • 1 Tbl canning salt
  • 2 1/2 cups (divided) Apple Cider Vinegar
  • 1 1/2 tsp celery seed
  • 1 tsp whole allspice
  • 1 tsp mustard seed
  • 1 stick cinnamon

Tie the spices into a spice bag (you can use a couple layers of cheesecloth or I use nylon pantyhose – clean of course) and simmer them in 1 1/2 cups of apple cider vinegar for about 10 minutes, Yes, your house will smell like vinegar! While that is simmering, add all the other ingredients except vinegar to the paste in a large pot. When the spices have simmered for about 10 minutes, take them out of the ACV and measure your spiced vinegar. Some of it will have evaporated during boiling, so add some of the extra to the spiced vinegar so that you have a total of 2 cups. Add that to your paste in the pot and stir well to combine everything. Heat to boiling, stirring often (very often).

Ladle hot ketchup into hot sterilized jars, wipe rims and put on lids. Process in a boiling waterbath for 10 minutes – adjust for altitude if necessary.


That’s it. Pretty simple. We’ll see how it turns out in a few days.

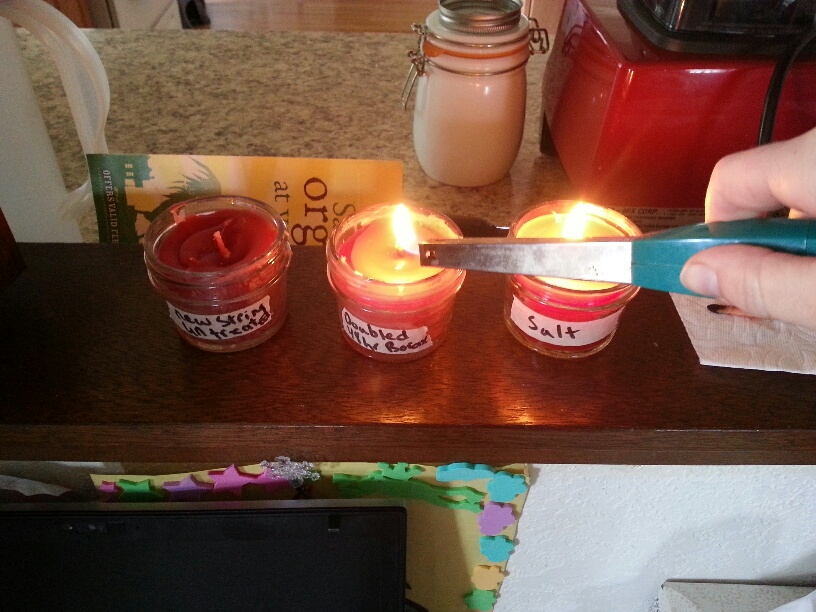
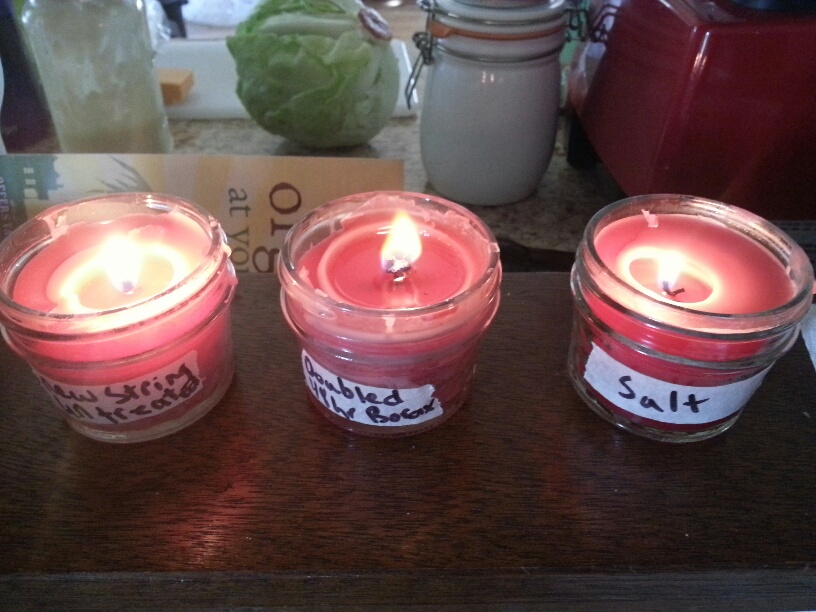
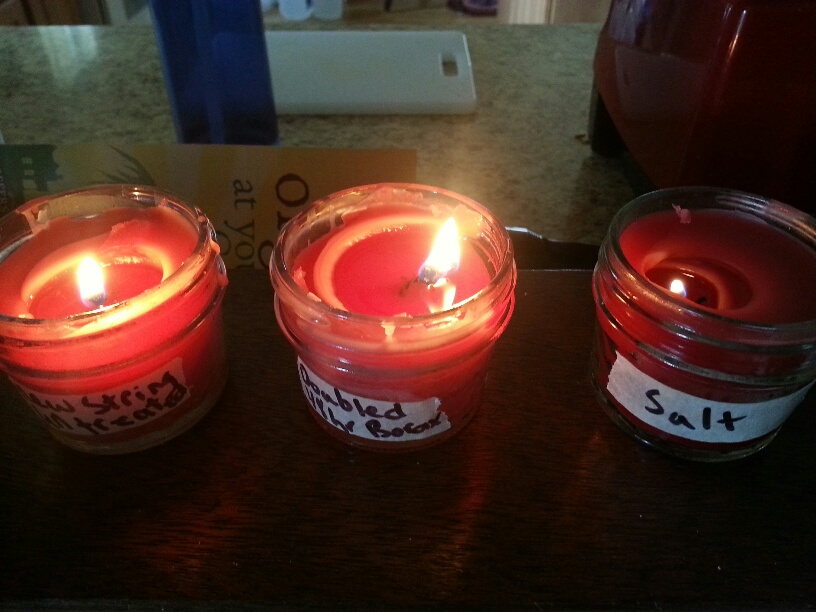
And speaking of how things turn out, I don’t think I shared a picture yet of the burned out candles.

20160218_104331_resized

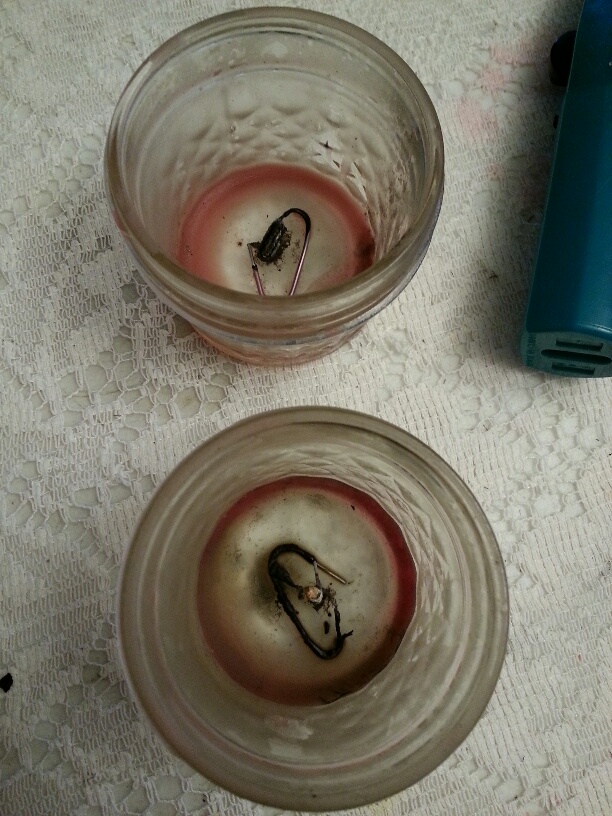
As I mentioned about the candles, they burned completely down, leaving no waste wax, and making it easy to retrieve the wick stands.

And speaking of the wick stands, here they are.

20160218_104431_resized

They look just fine to me. Sure the plastic coating burned, but they are still quite functional. In the future, I would probably try to use uncoated paperclips, but this is what I had.

In the last week, Spring has hit the Pacific Northwest! On one of my weekly walking routes I take, there is a stump of a tree that Flower Girl calls the Bee Tree for good reason.

20160222_133415_resized

It is so awesome to sit and watch the bees do their thing. You know there’s just gotta be some good honey in that tree! I’m hoping the city doesn’t tear it down. They have already topped the tree so it’s just a 10 foot tall stump. I’m hoping that means they plan to leave it for the bees.

20160222_135159_resized

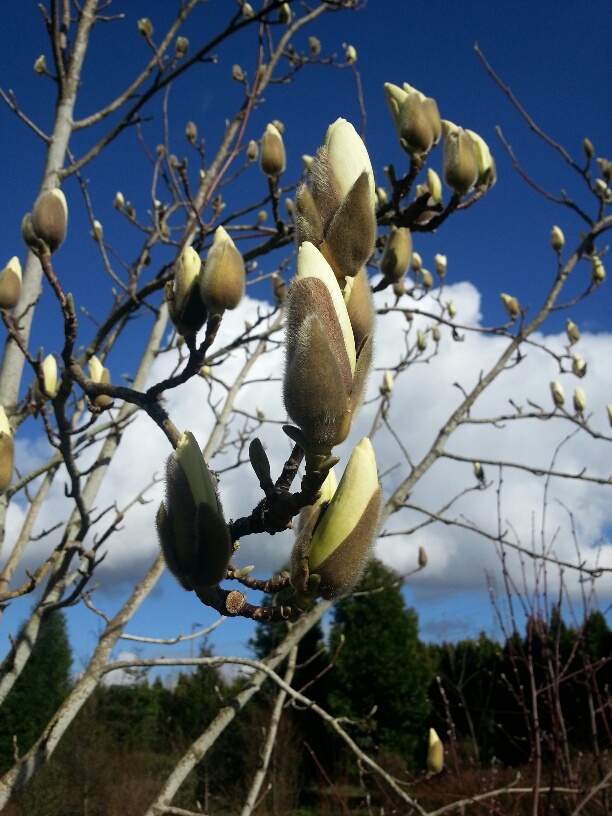
The tulip trees are just about to bloom. I’ve seen lots of fruit trees with blossoms, and tons of daffodils and hyacinth flowers around. Ahhh, I love spring!

And Flower Girl loves her Bachan (Japanese for “grandma”). I caught the two of them snuggling the other night. It was too precious.

20160218_210110_resized

And that’s all I can share for now.

So, are you dying to know about our big news? I’m dying to tell you. But we’re both gonna have to wait, ’cause I have a three year old who needs to get into bed. I’ll be back soon with another post, I promise.

Daily Life #23 – making lists, burning candles, and studying the Bible

No, not more candle tests, but I did let the ones I made burn all day today while I worked on making my Master Food Lists on the computer. I lit the candles (including the popsicle stick ones) at 7am, and other than the occasional wick trim, I didn’t do a single thing to them all day. Such a relief to finally be successful!

As I thought, the thicker string wick burned through its candle quite a bit faster than the thinner string. By 3 o’clock (nearly 12 hours total burn time)  the thicker wick had almost burned out. I blew it out along with all the others) since Princess Girl and I were leaving for our bible study date. When we got back, the thicker string candle would not re-light. It was too far gone.

But, I lit the others and they burned nearly till bed time. The thinner string candle burned for a total of 17 hours! And the smaller popsicle stick candle burned for probably 25 hours total. The larger popsicle stick candle has many, many more hours to burn!

One thing about the popsicle sticks is that they crackle as they burn. Kinda cool actually. 🙂

Both the popsicle stick wick and the thinner string wick ended up burning all of the wax. There is only a small residue of wax in the jars. This means that even with the smaller flames, they burn very efficiently.

I will take a look at the paperclip stands tomorrow and see how they fared when the flame burned all the way down. I’m hoping they will be usable again.

It was nice to get outside today and go for a walk with my girl. Then to sit in the coffee shop and watch the rain pour down as we sipped our coffees and talked about or Saviour. I love our weekly bible study dates.

image

As the evening progressed after dinner, I nearly finished our Master Food Lists. My goodness, we eat a lot of variety! I can’t even imagine trying to produce all that ourselves, even though with only a few exceptions it is theoretically possible. As I see the whole picture, I’m thinking that “producing/growing as much of our own food as possible” might be a bit overzealous unless we fairly drastically cut back on variety. However, more and more, I’m seeing the value of community. If I can’t, or don’t want to produce something, but my neighbor can, then it might just be worth it to buy it from them. Or better yet, barter for it!

At any rate, it’s still exciting to plan. Have you ever written out a list of the foods you actually eat? I highly recommend it. It can be an enlightening experiment.

Maridy

“I lift up my eyes to the hills, where does my help come from? My help comes from the Lord, the maker of heaven and earth.” Psalm 121

Daily Life #22 – FINAL Final candle tests

You know that scene in the movie Cast Away when Tom Hanks’ character finally manages to get a fire going?

image

Yeah, that’s how I’m feeling right now!

image

Ok, so my fire is not nearly as impressive as in the movie, but I’m proud of it.

I know. I know.

I said in yesterday’s post that I was done with testing. But I just couldn’t let it rest.

I hate stopping when I feel like there was more I could have done.

And this morning, something I had read jumped back into my head. I needed to try braiding my wicks!

Duh!

image

So, here we go again!

Two braided wicks, one from the thinner string (black and white cotton “bakers twine”) and one from the thicker string (white cotton string).

image

Both dipped in wax, straightened, cut to length, and put in paperclip wick stands.

image

Then, as I described yesterday, using some rubber bands to hold the wick in the middle of the jar, and pouring the wax in two stages, I had two more candles ready to test (after cooling off, of course.)

image

AND THEY WORK!!!

I’m sitting here with them burning beside me. They’ve been burning unassisted for three hours. No re-lighting needed. No straightening wicks needed. Nice tall flames with little to no smoke. And bright! I can definitely read a book by these if need be.

Because the wicks are two different sizes (thinner and thicker), they are burning the wax at different rates (and, yes, before anyone says anything, I do know that technically the wax itself is not burning, rather, it’s gasses given off as the wax evaporates due to the flame, or something like that. But you all know what I mean. 🙂 ).

image

In this picture, you can see that there is a rim of unmelted wax around the edges. This is the thinner string.

image

In this one, you can see that the wax is melted all the way across the jar, which means that this is actually the proper size wick for this size jar and this type of wax.

And that brings up a good point that I have not talked about. There are different kinds of waxes, with different melting points. The wax I am using is left overs from pillar candles. It is a harder wax with a higher melting temperature. This is a good thing for pillar candles since you don’t want them to melt and spill all over the place. That’s also what makes them good for taper candles. And as long as you have the right size wick for your jar, it makes an adequate jar candle, as well.

It will be interesting to see wich of these candles burn longer. The thinner wick because it’s not using up as much wax as it burns with it’s smaller flame, but is also leaving unused wax around the edges? Or the thicker wick which has a slightly larger flame, thus burning more rapidly, but also hotter to melt all the wax, thus providing more fuel?

From a survival standpoint, making candles in jars makes sense. They are easier to store since they won’t deform if they get hot, and they are harder to break.

Also, and probably more importlantly, they are safer. With tapers, you really have to be there with them at all times. If a taper candle tips a bit too much and wax starts pouring out the side, you can have issues very quickly.

So there you have it folks.

-Melt your wax in your desired method (I use a large coffee tin inside an old stockpot with some water in the pot. Kindof a double boiler effect. I also put several canning jar rings down in the bottom of the pot which the coffee can sits on. That way it’s not resting directly on the bottom of the pot which is getting direct heat from the burner. That may be overkill, but then I know I don’t have to worry about it.)
-While your wax is melting, braid your cotton twine (no special treatment necessary)
-Dip the braid in wax a couple times. Let cool and cut to size.
-Secure prepared wick in a paperclip and put it in your jar.
-Wrap three rubber bands aroud the jar (crossing the top, leaving a triangle in the middle), and place your wick in the middle of these rubber bands.
-Pour a bit of wax in to keep the wick stand from moving around.
-Once first layer of wax has solidified, fill the rest if the jar to the desired fullness.
-Let rest to cool and solidify. If desired, a bit more melted wax can be added after it has cooled completely in order to make the top flat.

That’s it. Yay! It works!

I’m so happy!

Now off yo bed!

Maridy

“I lift up my eyes to the hills, where does my help come from? My help comes from the Lord, the maker of heaven and earth.” Psalm 121

Daily Life #’s 19, 20, and 21 – Last candle tests, a day off, and some actual work on the homestead

On February 13 (day #19 of my month of Daily Life posts), in amongst the daily tasks of cooking, cleaning, and caring for family, I did my final burn tests on the candle wicks.

Unfortunately, the wicks still fell over, even after being carefully centered, held in place, and kept straight while pouring the wax. So that theory of mine was busted. Very frustrating.

But I decided I did like my new method for reusable wick stands and keeping the wicks straight. Paperclips and rubber bands. In fact, I also used the same to use a completely different kind of wick. A popsicle stick! In the picture below, you can see how I used the paperclip to hold the popsicle stick. I did the same thing with the wicks I tried. Theoretically, once the candle is burned, you can get the stand out and use it again.

image

Then, I wrapped some rubber bands around the jars and put the wicks in the middles, using the rubber bands to keep them centered. I was then able to pour in the wax. I did it in two pours this time. The first time I poured just enough that the wick base was submerged. I let that cool for a bit to solidify so that the wick wouldn’t move around when the jar was full of wax. Then I poured the jar the rest of the way with wax. This worked great to keep the wicks straight and centered till the wax firmed. Well, kinda.

One thing I learned is that when the wax cools, it will create a depression in the middle. This is no big deal with the small little jars I was using. However, when I tried to make a candle in a pint jar, the wax well was so large it pulled the wick down into the candle and rendered it unusable. This was not a problem with the popsicle stick since it is so rigid. With that one, I just filled the depression with more wax and let it solidify. I think if I was going to do a pint with a regular wick again, I’d have to keep it extra long and secure it somehow so it wouldn’t be sucked down into the well.

BUT, I don’t plan to fiddle with making any more jar candles in the near future. I was not impressed with the results. I’ll stick with tapers if I need to make my own candles without store bought wicks.

And the popsicle sticks weren’t really the answer either. True, they didn’t have problems with falling over, and they stayed burning for nearly 12 hours! So in that sense, they were great. And if you’re using the candles for ambiance or aroma therapy, then there you go. Use popsicle sticks as wicks. However, my reason for doing this testing was to know how to make candles in the event I ever HAD to make them for daily life. In that case, I’d want them as a light source, and in that area alone, the popsicle stick wicks were lacking. They burned steadily, but not very brightly.

I didn’t get any really good pictures of the burn test this time since there wasn’t anything to show. The picture below is of the popsicle stick candles (a small jar and a pint jar) when we were about to blow them out. They had been burning just like that all day. And since they burned with such a small flame, they hardly burned any wax.

image

So my final thoughts on all this: if you ever need to make candles in a survival situation, use a regular cotton string (no need to treat it with anything), and dip it in melted wax over and over till you have the size candle you want.

Experiment done!

On to Day 20 (February 14th). After church, we drove some friends out to a resort near the coast (they don’t have the transportation), and decided that since we were going to be so close anyway, we’d just keep going and spend some time on the beach.

Well, as usual on the Oregon coast in winter (or any time of the year really), the weather did not cooperate. But we came prepared and still had some fun.

image

Once it got dark, we stopped at a seafood place for dinner. Normally I stay away from breaded items since wheat affects my arthritis, but as a once in a while treat, I can tolerate it. We were going to get their clam chowder since we know it is dynamite, but they had run out. 😦

But let me tell you, The Fish Peddler has some killer fish and chips (well, fish, anyway. Their fries are good, but normal)!

image

I love the breading on the fish. Mmmmm…

It was sooo delish. And so far from what I typically eat that it really did feel like a treat.

It was a good day.

Day 21  (yesterday, February 15) was a momentous day, but also filled with frustration.

image

Know what this picture is?

That’s a backhoe.

On our property.

In Nevada.

Work has commenced!

We were so excited to finally be getting something done. My dad rented the hoe and tried to dig us our needed trench.

“Tried” being the operative word.

We knew it was rocky up there, but sheesh! He worked for a while with that thing and wasn’t able to get deeper than 3-4 feet deep. The trench needs to be 13 feet deep. Grrrr….

So now we have to have some engineers come up to the property, take a look around, and help us figure out what to do. And by “us”, of course, I mean my parents. Stinks to live so far away! But awesome to have such a wonderful support system down there.

So that’s where we are with the building. Can’t get our plans submitted for our permit until that trench is dug, and can’t dig the trench till we figure out how to do it.

Waiting, waiting, waiting…

In the mean time, I’ve started the project of documenting our food consumption.

image

I figure if we’re ever finally in a position to finally grow most of our own food, we should know what we normally eat and how much. It’s staggering to look at these lists and think of producing all that ourselves. And the picture above is just the veggies! BUT, aside from the olives and avacados, I was pleased to see that we can theoretically grow all that food (eventually) on the homestead.

My next step is to start quantifying how much of each item we typically eat. Some things, like asparagus, we love, but only eat it when it’s cheap at the grocery store. So it shouldn’t be too hard to grow as much as we might eat in a year. Other things like green beans and especially onions…yeah, we’d have to grow (and successfully store) several hundred onions to keep us in a year’s supply. Definitely worth more data collection.

And lucky me, I love that kind of work. 🙂 And it helps me feel like I’m actually working toward our goals for the homestead, even while sitting here in Oregon.

So that’s it for the last couple of days. It’s now been three weeks of me blogging about my everyday life. Only one more to go. 🙂

Maridy

“I lift up my eyes to the hills, where does my help come from? My help comes from the Lord, the maker of heaven and earth.” Psalm 121

Daily Life #’s 17 &18 – Groceries and Even MORE Candle Testing

Yesterday, February 11th was grocery shopping day. And it was a doozy! 4 hours and over $400! And there’s still a few things left to get at a different store.

But, it feels good to have the freezer and storage shelves filled up again. January is always a lean month as we recover financially from the holidays.

And our shopping trip came just in time since a good friend and her 4 kids joined us for dinner. Plenty of food to go around. Might not have been that way the day before. 🙂

Today, February 12 –
More candle testing today and I’m thrilled! We burned the taper/dipped candles we made the other day.

image

You like my make-do candle holders? We do have a couple of taper holders, but since I didn’t know how much/if these candles would melt all over the place, I decided to use these jars with foil. It worked remarkably well.

The three wicks I used were the 48 hour borax soaked (middle), the skinnier string untreated (right), and the thicker string untreated (left).

image

The girls wanted to burn the candles they made, as well. I don’t know how many times Flower Girl blew hers out then re-lit it by holding it up to one of the others.

image

It was immediately obvious that the borax soaked wick was not going to work very well. You can see from this picture the way the crystallized borax builds up on the wick. I don’t know if it was the borax alone, but this candle burned 4 times as fast as the others.

image

This is after just one hour. The borax wick candle is all but gone. The others, however, are doing great!

image

I needed my little jars to make some more candles, so I transfered these to taller jars. By this point (3 hour) burn time, all I had done to these candles is trim the wicks at hour 2. You can see in the above picture that the candle on the left (the thicker wick) has a taller flame and even though the candle started out taller, it is now shorter. The bigger wick is burning faster. It also smoked more.

image

By hour 4 it was just down to the candle with the smaller wick. It lasted a total of 5 1/2 hours. And I only trimmed the wick twice. There was very little smoking with this one, even when the wick was longest.

I think we have a winner!

And, yes, the only thing I did to this wick was dip it in wax. How’s that for minimalist candle making? 🙂

I made five more jar candles to test my theory that the main thing that affects the burnability of these wicks is that they are centered and straight rather than anything they may or may not be treated with. If they are straight, maybe they well stay upright easier. I figured out a way to keep the wicks centered and straight. I also figured out a new wick stand that is easier to use as well as reusable. But more on that tomorrow. For more, I’m tired and off to bed!

Maridy

“I lift up my eyes to the hills, where does my help come from? My help comes from the Lord, the maker of heaven and earth.” Psalm 121

Daily Life #16 – Volunteer work and More Candle Testing

As a family, we believe is very important to give back to the community. Since we are so blessed, we have no reason not to. One of the things the girls and I do is help to pack lunches for a homeless shelter every month. That’s what we did this morning.

We packed 50 lunches. Each lunch had a sandwich, a bag of chips, a piece of fruit, a dessert, and a bottle of water. Also, we add a note of encouragement, often made by the kids, to hopefully brighten someone’s day. I love that because we homeschool, Princess Girl is able to help out on days like this. The lessons she learns while helping those less fortunate is just as important, as book learning.

Today was also day #2 of candle testing. And after the standout results from yesterday, I was rather disappointed in how they performed today.

Today, I used one wick made out of a different string material only coated in wax, one wick made out of the same salt solution as yesterday, and I made a wick from the 48hr borax soak, only I twisted two strands together before waxing them.

So, let’s get this party started!

20160210_114635_resized

Lighting them up


20160210_124033_resized

One hour burn time

20160210_134305_resized

2 hrs burn time, after re-lighting the salt wick

20160210_141126_resized

two and a half hours burn time – all three wicks are falling over 😦

20160210_160137_resized

4 hour burn time. Had to baby them quite a bit the last two hours or so to keep them burning.

I think the pictures speak for themselves. I think the main reason is that the wicks keep falling over. As the wax melts there is not much support for to hold the wick upright. I was hoping that the thicker string wouldn’t fall over as easily. Or the doubled borax string. And since the salt wick did so well yesterday, I was disappointed to see that it did not do that well today. It actually did the worst today.

As I experiment with these and work on them, I am figuring some things out. Like it may depend more on the straightness of the wick more than what it is soaked in. I have a hard time getting the wick to stay in place when I pour in the wax. Yes, I know there are things you can buy to keep the wicks in place, but remember, I’m trying to do this with the minimum possible supplies. And namely things I might have around the house. And so far, I’m not seeing any real difference in how the wicks burn according to smoke rate and/or flame height and/or burn time. As long as the wicks stay upright, they all seem to burn the same.

So, in the next couple of days, I plan to work on the problem some more. I have a couple of ideas, so I’ll keep you updated.

Daily Life #15 – Candle Wick Testing

February 9

I’m am so pleased and surprised with today’s tests results.

To recap, my Man and I have decided that it is a good idea to practice some of those skills which we have a theoretical knowledge of, but have never really learned how to do ourselves. Such as making candles.

I started researching how to make candles when you can’t go out to the craft store and buy supplies. The basics are wax and cotton string. But I got to reading that you should treat the string with something in order for it to burn properly.

Most sources I found with a quick internet search said to use a solution of Borax and salt. I did find one or two which said just pre-soaking in the wax would do. And at least one source which stated that a salt solution would work.

Well, I wanted to see which one worked best. So, I pre-treated four lengths of string and another to use un-treated.

I made a solution of borax and salt (1 Tbl Salt, 2 Tbl Borax, 1 cup hot water). I soaked one length of string in it for 1 hour, one length of string in it for 48hours (was only supposed to be 24, but I forgot), and one length of string I soaked for 1 hour once the solution had cooled off.

I also made a salt solution (2 Tbl salt to one cup water) and soaked a length of string in that for 24 hours.

I then took those four strings (once dried), plus the untreated one and dipped them in melted wax 3-4 times and laid them out on foil to dry.

Yesterday, I cut the strings to size, put foil feet on them and put them in little jars, then poured hot wax into the jars.

Overnight, the wax solidified, and voila, I had candles!

Today was the big burn test.

At 10am we lit the five candles.

image

10 minutes later it was obvious that we were going to have troubles with the 48hr borax soaked wick.

image

I it wouldn’t stand up straight and I had to baby it along, as well as the other two wicks soaked in the borax solution. Every 10-15 minutes, I had to either straighten the wicks or relight them altogether.

At the thirty minutes mark, I trimmed the wicks down a bit on all the candles since they were all smoking quite a lot (except for the 48hr borax soaked one which was barely burning as you can see).

image

Finally, after about an hour, the 48hour soaked one seamed to be doing fine after being re-lit several times, but the other two borax ones still had to be taken care of every so often.

By two hours into it I had just about given up on the two candles with wicks soaked for an hour in the borax solution (the middle and far right). The 48hr soaked one was better than those two, but not by much. And the cold soak versus hot soak for an hour didn’t seem to make any difference at all. As for the candle with the untreated wick, I had straightened the wick and re-lit it once. And hadn’t touched the salt treated one even once!

image

By 12:30, after 2.5 hours of burning, I gave up on the borax treated ones.

image

However, the untreated one was still hanging in there, and the salt treated one was turning out to be a champ. Finally, after 4 hours of burning, even the candle with the non-treated wick gave up the ghost.

image

So, it’s the salt treated wick for the win!

I’m fact, it burned for a solid 6 hours without me having to do a thing to it! Eventually the wax liquefied enough that my poor aluminum foot couldn’t hold the wick in place any more and it fell over.

And, no, that is not what was happening to the others because they never burned enough to liquify to that point.

So, what now? Is this a definitive answer? Well, no. I want to try replicating the results. Because as any good scientist knows, if you can’t replicate it, it doesn’t count. So, while all this burning was happening, I made three new candles. One has a 48 hour soaked wick, but it is doubled up so maybe it will be stiffer and not fall over as easily. One has the same salt treated wick. And one had a wick from a different cotton string which I found. It is thicker and again, I’m hoping it will keep the wick from falling over as easily, which seemed to be the biggest problem. I also knotted the bottom of the string before making the aluminum foil foot, so the feet should hold the wicks better.

I will do another burn test tomorrow and let you know the results.

And today we also made taper candles.

image

image

image

I used some of the same wicks and want to do the same type of burn tests with those, too.

I’m having fun with this and hope you find this information useful.

Maridy

“I lift up my eyes to the hills, where does my help come from? My help comes from the Lord, the maker of heaven and earth.” Psalm 121