Category Archives: “Daily Life” journaling

One month in the daily life of this urban homesteader. January 26 – February 25, 2016

Final Daily Life Post – Deconstruction, EDC, and One Year after the Rooster Incident

February 25th.

It would have been my grandmother’s 91st birthday if she were alive. It’s also the 1 year anniversary of slicing my hand after decapitating a rooster. [Warning: if you click on the link, it has some rather graphic pictures from my emergency room visit.]

So how’s my hand doing one year later?

20160225_170636_resized

Well, it’s looking pretty good. The scar is fading (and disregard that other small cut. I scraped my hand on a nail today. And yes, my tetanus shot is up to date. Got it one year ago exactly). I don’t have too much lasting nerve damage. Just a little bit of numbness in the skin near the cut. And the only time it ever hurts anymore is if I hit it on something. Like yesterday, I hit it on the edge of the table. Oh, my, GOSH, that hurt! But otherwise, I don’t even think about it every day any more. Or if I do it’s a passing thought that doesn’t really enter my conscious. Over all, I am so blessed it wasn’t more serious.

And taking a picture of my hand reminded me that I’ve been wanting to do an EDC post for forever.

What is “EDC” you might ask. It stands for Every Day Carry. My hubby watches YouTube videos of gun guys and outdoor enthusiasts and they are always talking about the things they carry on them every day.

What does my hand have to do with my personal EDC? Well, in the picture you can see my watch. Yes, that pretty bracelet is a watch.

So here is this Homesteader’s EDC and some of the philosophy behind what I carry on my person every day. Not everything is related to homesteading, and some of it applies to my particular situation, so not everything would apply to everyone.

Watch: First, as in the picture above, I always wear a watch. I know lots of people who use their phones as a clock, but I believe it’s very practical to have one on you that you don’t have to pull out of your pocket to see. What if you’ve got mud and guck all over your hands as frequently happens to a homesteader?  And it has to be waterproof! I’ve killed too many non-waterproof watches just by washing my hands or forgetting I have it on and getting in the shower. This last Christmas, one of my moms got me the one I now wear every day. It’s waterproof so it’s pretty and practical. I love it!

Hair Tie: Next, I’ve always got at least one hair tie on my other wrist (along with a bracelet that Princess Girl made for me). With three females with long-ish hair in our family , I am always in need of a band to get one person or another’s hair back out of the way. I found these extra large hair ties at the grocery store. They are actually a bit loose on my wrist, so they don’t cut off my circulation. And the three of us have thick hair anyway, so they work great. But even if one or more of us had thin hair, the convenience of always having one on hand (pun not intended 😉 ) would outweigh the inconvenience of having to twist it around a pony tail a few extra times.20160225_170709_resized

Chapstick: I’m very particular about my chapstick. I only like one particular brand and only a couple of the flavors they produce. That’s the biggest reason I’ve never tried making my own. But I always have chapstick with me. Even up here in the humid Pacific Northwest, I use it on my lips a couple times a day. And down in arid Nevada? Yeah. I think you can figure that one out.

Another reason I’ve never tried making my own chapstick is that I need it to have a good SPF in it. The ones I buy are SPF 15, and when I’m out in the sun, I slather it on. If I don’t , I will end up with cold sores on my lips. No fun. Also, it works as a quick sunscreen for noses and cheeks if we find ourselves frying out in the sun without any on hand. I buy other chapsticks every once in a while to try to find another one that I can tolerate which has better ingredients. So far, I’ve struck out.

20160225_170849_resized

Flashlight: As you can see from the picture above, I also carry a small flashlight. This is something my wonderful husband got me this last Christmas. He carries one all the time and knows that when you have it, you use it. Constantly.

And he’s right. I’m thrilled that it is small enough to fit in my pocket or even clip on my wasteband, but since it’s modern LED technology, it is bright! I pull that thing out at least several times a week for one reason or another. And it doesn’t hurt that it’s purple. My favorite!

Knives: I carry two knives on me almost every day. The black folding knife is a cheaper replica of one I’ve had since I was 16 years old. I use it all. the. time. Imagine opening a box that just came in the mail. Instead of finding the scissors or a kitchen knife, I pull out my pocket knife. Or you’re outside cleaning up the chicken coop and find some bailing string tangled around the fence. Rather than leave it till later or go find something to cut it, I can whip out my knife right then and there and get the job done. I probably use it on average at least once a day. Now, it is a rather large knife (by normal standards) and I know the general public can be a bit nervous about sharp, pointy things, so I am careful when and where I whip it out. But it is a great tool to have on hand.

The other knife I carry is a mini multi tool. This is the kind that has the scissors in it as well as a few other tools. I use the scissors and knife blade the most. The scissors are great for when we’re out and about and I find a string that needs cutting, etc. Usually Princess Girl is asking to use them to cut the top off a honey straw. I use the knife blade in those situations when I don’t feel it appropriate to pull out my larger blade. But just the other day, I also used the screw driver it to tighten a screw. Worked great. Sometimes though, I’m wearing an outfit that doesn’t have the right pocket to carry this one, so it might not be worn.

Belt: Since I wear jeans 99% of the time, I have a belt on me 99% of the time. As I said in my post about making it, I decided that I would make a paracord belt so that I have tons of cordage on me at any time. Paracord can be used in thousands of ways, and I think I have about 75 feet of it in that belt. If I ever needed to disassemble the belt in order to use the cord, I would just cut a length to tie around my waist as a simple belt. And yes, this is not something I use every day – other than as a belt. It is truly an emergency item I like to have just in case.

Phone/Camera: The last thing I have on me constantly is my phone. Since we don’t have a house phone anymore, I like keeping my cell at hand. If it’s in the other room and someone calls, I won’t hear it. But more than that, I love having a good camera on me at all times. All the pictures on this blog were taken with my cell phones. I love that I can snap a picture or two (or 50) of whatever catches my fancy. And as a blogger, that means I can usually capture the moment to share with my readers later.

So these are the things that are on my person all the time. Or nearly so. There are times when whatever I’m dressed in isn’t conducive to wearing a belt, for instance. But really, the belt is about the only thing that I might leave off completely. My big knife and flashlight usually get tucked into the band of my bra so I can still wear them even with a dress. Not real comfy, but tolerable for a day. And I have chapsticks stashed in several places of the house so even if I don’t have it on me, they are easy to get to. And if I’m out and about, I will have my purse, and if it’s not on my body, it’s in my purse.

So there you go. An EDC for a homesteader.


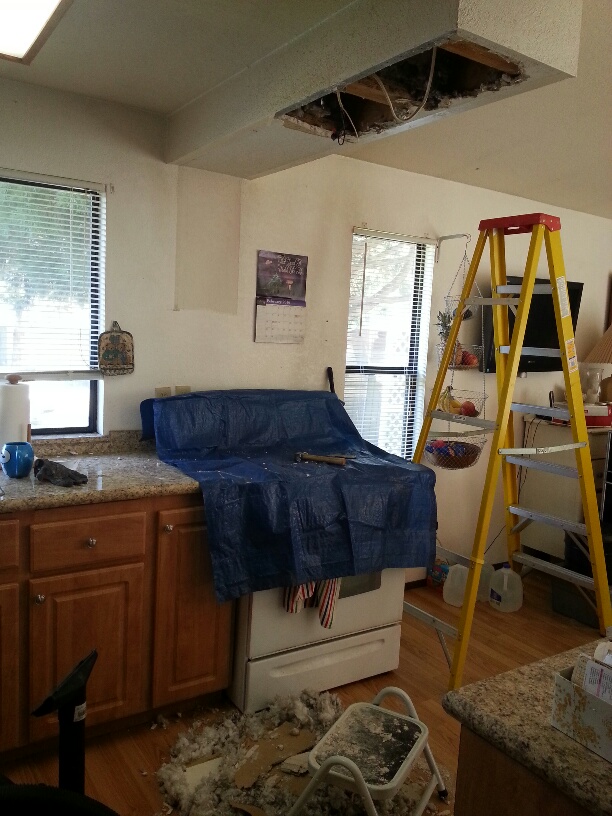
So today we started a project that is intended to get the house ready to sell. Years ago, Dad and Mom had their kitchen rearranged, but never did anything with the old soffit (a dropped down portion of the ceiling that the cabinets used to hang on.) So, today, we got that torn out and Dad and Hubs went to the store and bought an over the range microwave. Win-win! We finally will have a vented hood over the stove (which it should have had all along!), and the microwave will finally be up off the counter, giving us much more counter space!

20160225_112151_resized 20160225_113418_resized

20160225_120145_resized

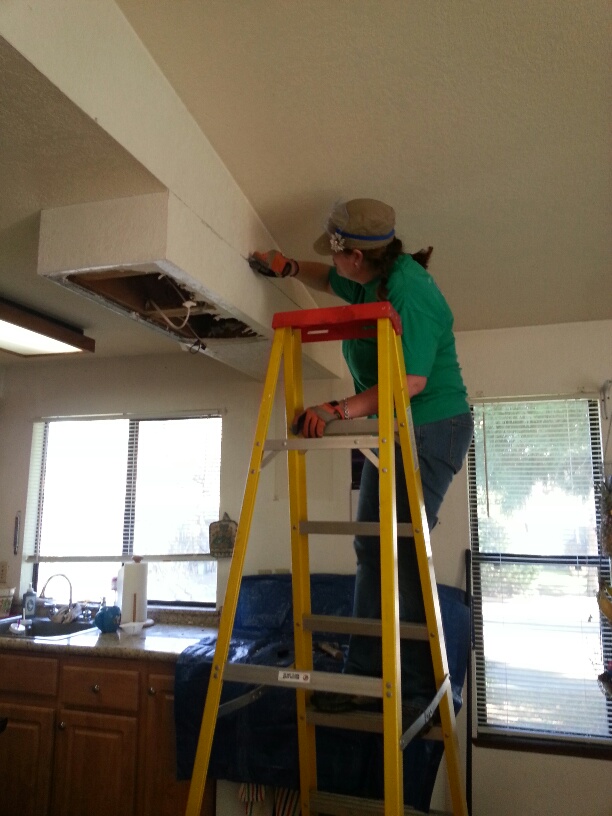
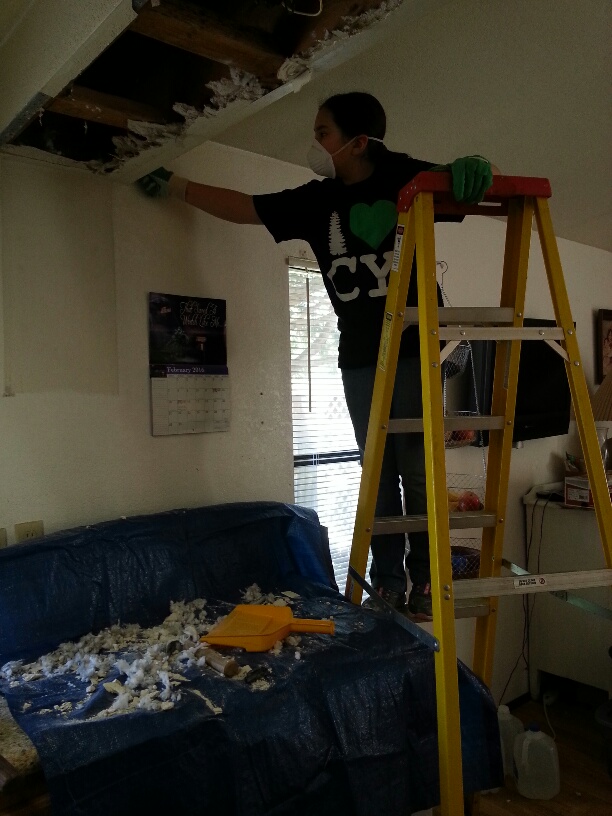
Princess Girl was a great help!

20160225_115116_resized

Flower Girl had my camera and wanted to take a picture of her “pitty pink shoes”.

20160225_115710_resized 20160225_131737_resized

20160225_152624_resized

All ready to do the electrical and hang the new microwave and then put new drywall in. Yay!

So that was our very eventful day yesterday. Oh, I also finally got some boxes so we can start boxing up things for storage or garage sale. Since we’re going to be living in the trailers afterall, we have to go through the downsizing process all over again. Especially Mom and Dad who own 90% of the stuff in this house. We don’t really have much to get rid of. But we do have a lot that needs to go back into storage. But I am totally ok with having to go through all this once more since it means we are moving back!

And speaking of packing and downsizing and storing, I probably won’t be posting very often since my updates would probably be along the lines of “More boxes packed today.” But if anything happens that is out of the ordinary or is part of our building process or actually has something to do with homesteading, I’ll be sure to let you know. 🙂

Until then, thanks for hanging in there with my mostly uneventful month of daily posts. Maybe once we get the house built and are settled onto the new place I’ll do it again and we’ll see how/if our daily routines will have changed much since I’ll be a homesteader living on a homestead rather than in the city. Maybe they will, maybe not. Because at the end of it all, us homesteaders are mostly just normal people who choose to live an uncommon lifestyle. And if all goes according to plan, our life is about to get even more uncommon. And we’re soooo looking forward to it!


Daily Life – Days 24 thru 30 – And a Ketchup recipe

Ok, so I know I’m a week behind. There is a reason, and it’s big news, but that is a post all on it’s own. Suffice to say, we’ve been busy, busy, busy the past week. And even though we are still super busy, I actually made ketchup today.

20160224_115415_resized

We were completely out, and I hate some of the ingredients in the store bought stuff. This is the second time I’ve ever made ketchup (or catsup if you prefer). This time I wanted to start with tomato paste. By starting with paste, it takes a lot of the time out of the process because you don’t have to simmer for so long.

I got three pints, which I processed, and another pint + a bit which went in the fridge and freezer.

I’m not sure how I like it yet. It doesn’t taste quite like ketchup that I’m used to. I have only made this recipe completely from scratch before, never from paste, so that may alter the taste. And I know from my previous attempt years ago that the taste does improve over time.

So I give you the recipe without my full endorsement since I can’t say I really like it yet. So take it as you will. 🙂

Tomato Paste Ketchup (4 pints)

  • 8 – 6oz cans of tomato paste
  • 2 Tbl onion powder
  • 3/4 cup Honey (or sweetener of your choice)
  • 1 Tbl canning salt
  • 2 1/2 cups (divided) Apple Cider Vinegar
  • 1 1/2 tsp celery seed
  • 1 tsp whole allspice
  • 1 tsp mustard seed
  • 1 stick cinnamon

Tie the spices into a spice bag (you can use a couple layers of cheesecloth or I use nylon pantyhose – clean of course) and simmer them in 1 1/2 cups of apple cider vinegar for about 10 minutes, Yes, your house will smell like vinegar! While that is simmering, add all the other ingredients except vinegar to the paste in a large pot. When the spices have simmered for about 10 minutes, take them out of the ACV and measure your spiced vinegar. Some of it will have evaporated during boiling, so add some of the extra to the spiced vinegar so that you have a total of 2 cups. Add that to your paste in the pot and stir well to combine everything. Heat to boiling, stirring often (very often).

Ladle hot ketchup into hot sterilized jars, wipe rims and put on lids. Process in a boiling waterbath for 10 minutes – adjust for altitude if necessary.


That’s it. Pretty simple. We’ll see how it turns out in a few days.

And speaking of how things turn out, I don’t think I shared a picture yet of the burned out candles.

20160218_104331_resized

As I mentioned about the candles, they burned completely down, leaving no waste wax, and making it easy to retrieve the wick stands.

And speaking of the wick stands, here they are.

20160218_104431_resized

They look just fine to me. Sure the plastic coating burned, but they are still quite functional. In the future, I would probably try to use uncoated paperclips, but this is what I had.

In the last week, Spring has hit the Pacific Northwest! On one of my weekly walking routes I take, there is a stump of a tree that Flower Girl calls the Bee Tree for good reason.

20160222_133415_resized

It is so awesome to sit and watch the bees do their thing. You know there’s just gotta be some good honey in that tree! I’m hoping the city doesn’t tear it down. They have already topped the tree so it’s just a 10 foot tall stump. I’m hoping that means they plan to leave it for the bees.

20160222_135159_resized

The tulip trees are just about to bloom. I’ve seen lots of fruit trees with blossoms, and tons of daffodils and hyacinth flowers around. Ahhh, I love spring!

And Flower Girl loves her Bachan (Japanese for “grandma”). I caught the two of them snuggling the other night. It was too precious.

20160218_210110_resized

And that’s all I can share for now.

So, are you dying to know about our big news? I’m dying to tell you. But we’re both gonna have to wait, ’cause I have a three year old who needs to get into bed. I’ll be back soon with another post, I promise.

Daily Life #23 – making lists, burning candles, and studying the Bible

No, not more candle tests, but I did let the ones I made burn all day today while I worked on making my Master Food Lists on the computer. I lit the candles (including the popsicle stick ones) at 7am, and other than the occasional wick trim, I didn’t do a single thing to them all day. Such a relief to finally be successful!

As I thought, the thicker string wick burned through its candle quite a bit faster than the thinner string. By 3 o’clock (nearly 12 hours total burn time)  the thicker wick had almost burned out. I blew it out along with all the others) since Princess Girl and I were leaving for our bible study date. When we got back, the thicker string candle would not re-light. It was too far gone.

But, I lit the others and they burned nearly till bed time. The thinner string candle burned for a total of 17 hours! And the smaller popsicle stick candle burned for probably 25 hours total. The larger popsicle stick candle has many, many more hours to burn!

One thing about the popsicle sticks is that they crackle as they burn. Kinda cool actually. 🙂

Both the popsicle stick wick and the thinner string wick ended up burning all of the wax. There is only a small residue of wax in the jars. This means that even with the smaller flames, they burn very efficiently.

I will take a look at the paperclip stands tomorrow and see how they fared when the flame burned all the way down. I’m hoping they will be usable again.

It was nice to get outside today and go for a walk with my girl. Then to sit in the coffee shop and watch the rain pour down as we sipped our coffees and talked about or Saviour. I love our weekly bible study dates.

image

As the evening progressed after dinner, I nearly finished our Master Food Lists. My goodness, we eat a lot of variety! I can’t even imagine trying to produce all that ourselves, even though with only a few exceptions it is theoretically possible. As I see the whole picture, I’m thinking that “producing/growing as much of our own food as possible” might be a bit overzealous unless we fairly drastically cut back on variety. However, more and more, I’m seeing the value of community. If I can’t, or don’t want to produce something, but my neighbor can, then it might just be worth it to buy it from them. Or better yet, barter for it!

At any rate, it’s still exciting to plan. Have you ever written out a list of the foods you actually eat? I highly recommend it. It can be an enlightening experiment.

Maridy

“I lift up my eyes to the hills, where does my help come from? My help comes from the Lord, the maker of heaven and earth.” Psalm 121

Daily Life #22 – FINAL Final candle tests

You know that scene in the movie Cast Away when Tom Hanks’ character finally manages to get a fire going?

image

Yeah, that’s how I’m feeling right now!

image

Ok, so my fire is not nearly as impressive as in the movie, but I’m proud of it.

I know. I know.

I said in yesterday’s post that I was done with testing. But I just couldn’t let it rest.

I hate stopping when I feel like there was more I could have done.

And this morning, something I had read jumped back into my head. I needed to try braiding my wicks!

Duh!

image

So, here we go again!

Two braided wicks, one from the thinner string (black and white cotton “bakers twine”) and one from the thicker string (white cotton string).

image

Both dipped in wax, straightened, cut to length, and put in paperclip wick stands.

image

Then, as I described yesterday, using some rubber bands to hold the wick in the middle of the jar, and pouring the wax in two stages, I had two more candles ready to test (after cooling off, of course.)

image

AND THEY WORK!!!

I’m sitting here with them burning beside me. They’ve been burning unassisted for three hours. No re-lighting needed. No straightening wicks needed. Nice tall flames with little to no smoke. And bright! I can definitely read a book by these if need be.

Because the wicks are two different sizes (thinner and thicker), they are burning the wax at different rates (and, yes, before anyone says anything, I do know that technically the wax itself is not burning, rather, it’s gasses given off as the wax evaporates due to the flame, or something like that. But you all know what I mean. 🙂 ).

image

In this picture, you can see that there is a rim of unmelted wax around the edges. This is the thinner string.

image

In this one, you can see that the wax is melted all the way across the jar, which means that this is actually the proper size wick for this size jar and this type of wax.

And that brings up a good point that I have not talked about. There are different kinds of waxes, with different melting points. The wax I am using is left overs from pillar candles. It is a harder wax with a higher melting temperature. This is a good thing for pillar candles since you don’t want them to melt and spill all over the place. That’s also what makes them good for taper candles. And as long as you have the right size wick for your jar, it makes an adequate jar candle, as well.

It will be interesting to see wich of these candles burn longer. The thinner wick because it’s not using up as much wax as it burns with it’s smaller flame, but is also leaving unused wax around the edges? Or the thicker wick which has a slightly larger flame, thus burning more rapidly, but also hotter to melt all the wax, thus providing more fuel?

From a survival standpoint, making candles in jars makes sense. They are easier to store since they won’t deform if they get hot, and they are harder to break.

Also, and probably more importlantly, they are safer. With tapers, you really have to be there with them at all times. If a taper candle tips a bit too much and wax starts pouring out the side, you can have issues very quickly.

So there you have it folks.

-Melt your wax in your desired method (I use a large coffee tin inside an old stockpot with some water in the pot. Kindof a double boiler effect. I also put several canning jar rings down in the bottom of the pot which the coffee can sits on. That way it’s not resting directly on the bottom of the pot which is getting direct heat from the burner. That may be overkill, but then I know I don’t have to worry about it.)
-While your wax is melting, braid your cotton twine (no special treatment necessary)
-Dip the braid in wax a couple times. Let cool and cut to size.
-Secure prepared wick in a paperclip and put it in your jar.
-Wrap three rubber bands aroud the jar (crossing the top, leaving a triangle in the middle), and place your wick in the middle of these rubber bands.
-Pour a bit of wax in to keep the wick stand from moving around.
-Once first layer of wax has solidified, fill the rest if the jar to the desired fullness.
-Let rest to cool and solidify. If desired, a bit more melted wax can be added after it has cooled completely in order to make the top flat.

That’s it. Yay! It works!

I’m so happy!

Now off yo bed!

Maridy

“I lift up my eyes to the hills, where does my help come from? My help comes from the Lord, the maker of heaven and earth.” Psalm 121

Daily Life #’s 19, 20, and 21 – Last candle tests, a day off, and some actual work on the homestead

On February 13 (day #19 of my month of Daily Life posts), in amongst the daily tasks of cooking, cleaning, and caring for family, I did my final burn tests on the candle wicks.

Unfortunately, the wicks still fell over, even after being carefully centered, held in place, and kept straight while pouring the wax. So that theory of mine was busted. Very frustrating.

But I decided I did like my new method for reusable wick stands and keeping the wicks straight. Paperclips and rubber bands. In fact, I also used the same to use a completely different kind of wick. A popsicle stick! In the picture below, you can see how I used the paperclip to hold the popsicle stick. I did the same thing with the wicks I tried. Theoretically, once the candle is burned, you can get the stand out and use it again.

image

Then, I wrapped some rubber bands around the jars and put the wicks in the middles, using the rubber bands to keep them centered. I was then able to pour in the wax. I did it in two pours this time. The first time I poured just enough that the wick base was submerged. I let that cool for a bit to solidify so that the wick wouldn’t move around when the jar was full of wax. Then I poured the jar the rest of the way with wax. This worked great to keep the wicks straight and centered till the wax firmed. Well, kinda.

One thing I learned is that when the wax cools, it will create a depression in the middle. This is no big deal with the small little jars I was using. However, when I tried to make a candle in a pint jar, the wax well was so large it pulled the wick down into the candle and rendered it unusable. This was not a problem with the popsicle stick since it is so rigid. With that one, I just filled the depression with more wax and let it solidify. I think if I was going to do a pint with a regular wick again, I’d have to keep it extra long and secure it somehow so it wouldn’t be sucked down into the well.

BUT, I don’t plan to fiddle with making any more jar candles in the near future. I was not impressed with the results. I’ll stick with tapers if I need to make my own candles without store bought wicks.

And the popsicle sticks weren’t really the answer either. True, they didn’t have problems with falling over, and they stayed burning for nearly 12 hours! So in that sense, they were great. And if you’re using the candles for ambiance or aroma therapy, then there you go. Use popsicle sticks as wicks. However, my reason for doing this testing was to know how to make candles in the event I ever HAD to make them for daily life. In that case, I’d want them as a light source, and in that area alone, the popsicle stick wicks were lacking. They burned steadily, but not very brightly.

I didn’t get any really good pictures of the burn test this time since there wasn’t anything to show. The picture below is of the popsicle stick candles (a small jar and a pint jar) when we were about to blow them out. They had been burning just like that all day. And since they burned with such a small flame, they hardly burned any wax.

image

So my final thoughts on all this: if you ever need to make candles in a survival situation, use a regular cotton string (no need to treat it with anything), and dip it in melted wax over and over till you have the size candle you want.

Experiment done!

On to Day 20 (February 14th). After church, we drove some friends out to a resort near the coast (they don’t have the transportation), and decided that since we were going to be so close anyway, we’d just keep going and spend some time on the beach.

Well, as usual on the Oregon coast in winter (or any time of the year really), the weather did not cooperate. But we came prepared and still had some fun.

image

Once it got dark, we stopped at a seafood place for dinner. Normally I stay away from breaded items since wheat affects my arthritis, but as a once in a while treat, I can tolerate it. We were going to get their clam chowder since we know it is dynamite, but they had run out. 😦

But let me tell you, The Fish Peddler has some killer fish and chips (well, fish, anyway. Their fries are good, but normal)!

image

I love the breading on the fish. Mmmmm…

It was sooo delish. And so far from what I typically eat that it really did feel like a treat.

It was a good day.

Day 21  (yesterday, February 15) was a momentous day, but also filled with frustration.

image

Know what this picture is?

That’s a backhoe.

On our property.

In Nevada.

Work has commenced!

We were so excited to finally be getting something done. My dad rented the hoe and tried to dig us our needed trench.

“Tried” being the operative word.

We knew it was rocky up there, but sheesh! He worked for a while with that thing and wasn’t able to get deeper than 3-4 feet deep. The trench needs to be 13 feet deep. Grrrr….

So now we have to have some engineers come up to the property, take a look around, and help us figure out what to do. And by “us”, of course, I mean my parents. Stinks to live so far away! But awesome to have such a wonderful support system down there.

So that’s where we are with the building. Can’t get our plans submitted for our permit until that trench is dug, and can’t dig the trench till we figure out how to do it.

Waiting, waiting, waiting…

In the mean time, I’ve started the project of documenting our food consumption.

image

I figure if we’re ever finally in a position to finally grow most of our own food, we should know what we normally eat and how much. It’s staggering to look at these lists and think of producing all that ourselves. And the picture above is just the veggies! BUT, aside from the olives and avacados, I was pleased to see that we can theoretically grow all that food (eventually) on the homestead.

My next step is to start quantifying how much of each item we typically eat. Some things, like asparagus, we love, but only eat it when it’s cheap at the grocery store. So it shouldn’t be too hard to grow as much as we might eat in a year. Other things like green beans and especially onions…yeah, we’d have to grow (and successfully store) several hundred onions to keep us in a year’s supply. Definitely worth more data collection.

And lucky me, I love that kind of work. 🙂 And it helps me feel like I’m actually working toward our goals for the homestead, even while sitting here in Oregon.

So that’s it for the last couple of days. It’s now been three weeks of me blogging about my everyday life. Only one more to go. 🙂

Maridy

“I lift up my eyes to the hills, where does my help come from? My help comes from the Lord, the maker of heaven and earth.” Psalm 121

Daily Life #’s 17 &18 – Groceries and Even MORE Candle Testing

Yesterday, February 11th was grocery shopping day. And it was a doozy! 4 hours and over $400! And there’s still a few things left to get at a different store.

But, it feels good to have the freezer and storage shelves filled up again. January is always a lean month as we recover financially from the holidays.

And our shopping trip came just in time since a good friend and her 4 kids joined us for dinner. Plenty of food to go around. Might not have been that way the day before. 🙂

Today, February 12 –
More candle testing today and I’m thrilled! We burned the taper/dipped candles we made the other day.

image

You like my make-do candle holders? We do have a couple of taper holders, but since I didn’t know how much/if these candles would melt all over the place, I decided to use these jars with foil. It worked remarkably well.

The three wicks I used were the 48 hour borax soaked (middle), the skinnier string untreated (right), and the thicker string untreated (left).

image

The girls wanted to burn the candles they made, as well. I don’t know how many times Flower Girl blew hers out then re-lit it by holding it up to one of the others.

image

It was immediately obvious that the borax soaked wick was not going to work very well. You can see from this picture the way the crystallized borax builds up on the wick. I don’t know if it was the borax alone, but this candle burned 4 times as fast as the others.

image

This is after just one hour. The borax wick candle is all but gone. The others, however, are doing great!

image

I needed my little jars to make some more candles, so I transfered these to taller jars. By this point (3 hour) burn time, all I had done to these candles is trim the wicks at hour 2. You can see in the above picture that the candle on the left (the thicker wick) has a taller flame and even though the candle started out taller, it is now shorter. The bigger wick is burning faster. It also smoked more.

image

By hour 4 it was just down to the candle with the smaller wick. It lasted a total of 5 1/2 hours. And I only trimmed the wick twice. There was very little smoking with this one, even when the wick was longest.

I think we have a winner!

And, yes, the only thing I did to this wick was dip it in wax. How’s that for minimalist candle making? 🙂

I made five more jar candles to test my theory that the main thing that affects the burnability of these wicks is that they are centered and straight rather than anything they may or may not be treated with. If they are straight, maybe they well stay upright easier. I figured out a way to keep the wicks centered and straight. I also figured out a new wick stand that is easier to use as well as reusable. But more on that tomorrow. For more, I’m tired and off to bed!

Maridy

“I lift up my eyes to the hills, where does my help come from? My help comes from the Lord, the maker of heaven and earth.” Psalm 121

Daily Life #16 – Volunteer work and More Candle Testing

As a family, we believe is very important to give back to the community. Since we are so blessed, we have no reason not to. One of the things the girls and I do is help to pack lunches for a homeless shelter every month. That’s what we did this morning.

We packed 50 lunches. Each lunch had a sandwich, a bag of chips, a piece of fruit, a dessert, and a bottle of water. Also, we add a note of encouragement, often made by the kids, to hopefully brighten someone’s day. I love that because we homeschool, Princess Girl is able to help out on days like this. The lessons she learns while helping those less fortunate is just as important, as book learning.

Today was also day #2 of candle testing. And after the standout results from yesterday, I was rather disappointed in how they performed today.

Today, I used one wick made out of a different string material only coated in wax, one wick made out of the same salt solution as yesterday, and I made a wick from the 48hr borax soak, only I twisted two strands together before waxing them.

So, let’s get this party started!

20160210_114635_resized

Lighting them up


20160210_124033_resized

One hour burn time

20160210_134305_resized

2 hrs burn time, after re-lighting the salt wick

20160210_141126_resized

two and a half hours burn time – all three wicks are falling over 😦

20160210_160137_resized

4 hour burn time. Had to baby them quite a bit the last two hours or so to keep them burning.

I think the pictures speak for themselves. I think the main reason is that the wicks keep falling over. As the wax melts there is not much support for to hold the wick upright. I was hoping that the thicker string wouldn’t fall over as easily. Or the doubled borax string. And since the salt wick did so well yesterday, I was disappointed to see that it did not do that well today. It actually did the worst today.

As I experiment with these and work on them, I am figuring some things out. Like it may depend more on the straightness of the wick more than what it is soaked in. I have a hard time getting the wick to stay in place when I pour in the wax. Yes, I know there are things you can buy to keep the wicks in place, but remember, I’m trying to do this with the minimum possible supplies. And namely things I might have around the house. And so far, I’m not seeing any real difference in how the wicks burn according to smoke rate and/or flame height and/or burn time. As long as the wicks stay upright, they all seem to burn the same.

So, in the next couple of days, I plan to work on the problem some more. I have a couple of ideas, so I’ll keep you updated.

Daily Life #14 – Candles

February 8th

I made candles!

Yes, I have made candles in the past. The waaaaaaay past. Like, I was a kid and it was a school project.

And as I mentioned last week, I wanted to try making candles from scratch, including the wicks. So today’s project was to finish the wicks, and get the candles made so that I can do the burn test tomorrow.

Over the last week or two, I’ve been soaking and drying string in several different solutions. Today I dipped them in wax, let them dry, cut them to size, made little feet for them out of aluminum foil (worked with mixed results), put them in labeled jars, and poured in the hot wax.

image

Waxing the wicks

image

Homemade wick with homemade stand

A couple of these little feet fell off the string when they came in contact with the hot wax being poured into the jar. I have and idea of how to fix it next time.

image

Homemade candles - I used the aluminum foil to hold the wicks in the middle of the candle.

It’s a good thing to put down some sort of protection on the counter, because candle making is messy!

I’m excited to see how they do tomorrow. When I get the results of the burn tests I will post a full report.

As for today, we enjoyed some rare sunshine and warm weather. So nice to get outside and soak up some vitamin D.

image

Maridy

“I lift up my eyes to the hills, where does my help come from? My help comes from the Lord, the maker of heaven and earth.” Psalm 121

Daily Life #13 – Bacon Wrapped Stuffed Jalapenos and Organizing the Garage

February 7
Such a lovely day today. We drove home from church with the windows open in the van! Glorious, sunny warmth!

When we got home and had a bite to eat to tide us over till later, I intended to start on my jalapeno poppers for the big game. But there were a bunch of empty jars on the counter which needed to go back out to the garage.

I took them out and got distracted by the chaos. I mean, where was I to put another couple of jars??

image

Unorganized chaos

Empty jars on all available surfaces, empty boxes taking up valuable space, filled boxes on the floor in front of the shelves. Yeah, it wasn’t pretty.

After a couple hours of work, it was much cleaner and useable.

image

Still a bit chaotic, but much more organized

One of the features I like the most is that I finally have a dedicated spot for my empty jars to go.

image

Labeled spots for them so that no one has an excuse for not putting them away where they belong!

I feel so accomplished.

Well, by the time I finished up in the garage, the game was just about to begin, so it was definitely time to get those stuffed jalapenos made.

Now, I’m not a huge fan of spicy foods, but I enjoy the flavor of jalapenos, especially when paired with cream cheese. And bacon? Well, bacon makes just about everything better!

And by carefully cleaning out the seeds and membranes from the peppers, it lessens their kick.

These are a great appetizer for any sort of gathering and I love that there are only three ingredients (ok, well, technically the bacon and cream cheese each have multiple ingredients themselves, but youknowwhatimean.) And depending on where you are in your health journey, you can choose cream cheese and/or bacon that are more healthily made. For now, we use grocery store brands.

So, without further ado, here’s the recipe.

BACON WRAPPED STUFFED JALAPENOS
Ingredients
15 jalapenos
1 (8oz) pkg cream cheese
1 lb bacon

First, gather all your supplies. And if it’s game day, hopefully you can prep things where you can see the game. 🙂

image

Slice the stem off the jalapenos and then slice each pepper in half lengthwise. Carefully clean out all the seeds and membranes. NOTE: you might want to wear gloves when dealing with the peppers, especially if you are sensitive. I never need to, but I make sure to wash my hands thoroughly before touching anything else.

image

Fill each pepper half with creamcheese.

image

Then cut your bacon pieces in half and wrap them around the stuffed jalapenos and place on a baking sheet. Sometimes, I just lay a piece of bacon over the top rather than wrapping it. We buy thick slice bacon, and 1 lb is usually the perfect number of slices.

image

Bake at 350° for 20-30 minutes until the bacon is crisp to your liking.

image

And that’s it!
Oh, my! These are delicious! Just enough heat, but not enough to send me running for the milk. Usually.

Sometimes one bite is more spicy than the others and has me fanning my mouth and contemplating guzzling straight from the milk jug! But I can deal with it. If you don’t find jalapenos all that hot, you’ll have no problems.

And now for a gratuitous picture of cuteness and silliness from our girls. 🙂

image

Maridy

“I lift up my eyes to the hills, where does my help come from? My help comes from the Lord, the maker of heaven and earth.” Psalm 121

Daily Life #12 – Handmade with love

I love that man of mine! Every day, all day. But there are times when he does something which just melts my heart an extra bit.

Like what’s happening right now.

We are not really what you would call sports fans. But we do like to watch the Super Bowl. So in preparation for tomorrow’s game, my wonderful husband is sitting down explaining football to Princess Girl so she can follow along easier.

Be still my heart!

Yeah, I know it’s not much. But one sure way to this girl’s heart is through her children. Not only that, but I just love seeing a man being a good daddy.

And speaking of love, Valentine’s day is just around the corner.

I am almost finished with Hubby’s Valentine gift. In an effort to stick with our new, healthier ways of eating, we have decided to forgo the candy this year (I know, it’s almost sacrilegious to not have chocolate on Valentine’s day, but I think I’ll survive. Maybe.)

Anyway, I came up with some inexpensive and easy gift the girls and I can make for our main man. I wish I could show it to you right now. But it will have to wait.

I also started another bookmark for a special someone. This one is extra special since there is no printer involved. I’m drawing and coloring by hand. And I’m actually excited about how it’s turning out.

Working on these things by hand is so much more personal than just buying something from the store. No, they don’t cost much, and may not look as nice as something you can buy of the shelf, but each one is infused with love.

And speaking of love, you know what else makes my heart melt?

image

My three year old washing the last of the carrots from the garden. I was able to start her on the task and walk away to finish other tasks. Yes, she took forever, but she did the job and did it well. When did she get so big??

And, for those of you who have been around for a while, yes, these are the last of the carrots which we planted from seed last February. They are oddly misshapen, I think because they stopped growing over the summer, and then started growing again this fall. They overwintered wonderfully in the garden. WAY better than they would have if I had picked them. One of the reasons I live growing carrots in this area!

Maridy

“I lift up my eyes to the hills, where does my help come from? My help comes from the Lord, the maker of heaven and earth.” Psalm 121