Author Archives: Maridy

Unknown's avatar

About Maridy

Hi, I'm Maridy. I have many interests in life. Right now, my husband and I and our two girls (ages 14 and 7), along with a couple of dogs currently live in a 33ft trailer while we build our house on our homestead property in Northern Nevada (Castle Rock Homestead). Follow us on that journey to building our high desert homestead from the ground up! I also have a passion for hiking and have a blog for that, too. (Journey in the Wilderness) Join me there as I explore the beautiful outdoor landscapes of Northwestern Nevada and Eastern California. And finally, I love historical costuming. Though I haven't been able to do much of that in recent years, I'm hoping that "once the house is built" I'll be able to get back into it more. See what all we've done with that on my Yesteryear Productions blog.

Building update – and a great wood cutting tip!

For those of you who do not follow us on Facebook or Instagram, you probably don’t know that we actually started building our house! 

Finally!

After months and months of permit delays. And more and more months of weather delays, we finally “broke ground” on Easter weekend.

Bringing in “DG” (decomposed granite) to level out the house pad.

The perimeter of the house outlined in compacted and leveled DG

Once the pad was leveled, it was time to build the footing forms. We decided to build the forms up and backfill rather than try to dig down into our very bouldery ground. 

Yes. “Bouldery.” See all those huge boulders in the above pictures? That’s what lies just below the surface up here!

The first day’s progress.

Yup, that’s me, putting one of the pier footing forms together.

We have a family friend who is a licensed contractor who is helping us get all this right (that’s him in the red plaid shirt). We couldn’t do it nearly so well or as easily without his help. As with many things in life, it’s not what you know, it’s who you know. And we are so very glad to know him (and that he is so generous with his time) ’cause we don’t know much!

Princess Girl, “Mom, I need ‘more cowbell’!” So proud of my girl. Not only was she a huge help putting all those “cowbells” on the forms, but she also quoted a Saturday Night Live skit. Yep, we’re raising her right! 😃

Building: a family affair

The perimeter of the house footings – almost completely built. Now to do all the leveling and put in rebar, etc.

It’s so wonderful to see the progress after waiting for so long. 

And today I learned something new. Something that makes me say, “No way!” A new way to use a skill saw!

I’ve used a skill saw for 20+ years and just today learned something new. I’ve seen the pros (building contractors, etc) use a skill saw in a certain way but never knew why. Today, I tried it and was blown away with the results!

The old way: you lay the 2×4 flat on the sawhorse(s) and hold it with one hand while pushing the saw across the wood. All the while, the force of the saw pushes against the board and it is hard to hold it still. 

The old way.

Close up – old way

In order to hold the wood still, you can use a clamp, but that takes a while to put in place and remove, and when you’re making a bunch of cuts as I was today, they are too cumbersome to use.

I’m not sure what made me think to try something new, but I figured, what could it hurt?

The new way: So, I turned the 2×4 up on it’s long edge at about a 45 degree angle and the saw cut through so easily, I was shocked. I had no trouble keeping the saw on the cutting line, and the weight of the saw pushed it’s own way though the wood. 

The new way: turn that wood up on it’s edge!

Close up – the new way

The wood rests on the sawhorse and the force of the saw is pushing downward rather than across, so the board doesn’t move around.
So easy!

This technique will make the thousands of cuts I’ll be making over the coming months that much easier. 

Just goes to prove that it’s never too late to learn something new.

Change of plans

First, we had to delay starting our house because we had to move to Portland for almost 2 years to help care for the Hubby’s mom. 

We ended up needing to plan a bigger house than we originally thought in order to accommodate Hubby’s folks moving in with us.

Then we had to completely move the location of the house from one side of our 40 acre property to the other because the original site didn’t have a good spot for septic.

We planned to get more work done over the winter, but the weather did not cooperate.

And here we are, having to change some of our house plans. 

Yet again.

Plotting the original corner of the house

It wasn’t a major change, we just changed the directional orientation of the house a few degrees. It amounted to moving the house about 15ft. Not that big of a deal, except that it really cuts down on the amount of driveway and parking area we’ll have. It was just feeling…Well, cramped. 
And yes, we do have 40 acres, but only about 3 of those are not on the side of a steep hill. And the house pad is carved out of the side of one of those hills. So we are kinda limited on space in some ways. 

But I digress. Since we changed the angle of the house, we had to look at where the detached garage is going to be built and how to get more space.

Which made us consider doing some earth moving in a area where we planned to put our orchard.

Which would give us much more space on the house pad, but where to put the orchard instead? 

Which made us look around and decide that the other logical place for the orchard is actually better. 

Which made us realize once again that when plans have to change for one reason or another, there’s usually a silver lining. I could go down the list at the beginning of this post and show how  because we had to do it differently than originally planned, we’re actually better off now than we would have been had our original plans gone through. 

In the Bible, James tells us that when we make our plans we need to realize that God is the one who is ultimately in control and we can only follow through with our plans if it is his will (James 4;13-15). Similarly, Proverbs 19:21 says, “Many are the plans in a man’s heart, but it is the Lord’s purpose that prevails.”

We try to remember these truths when making our plans, and realizing that when plans change, it’s all for the best, in one way or another.

The BEST backyard chicken breeds?

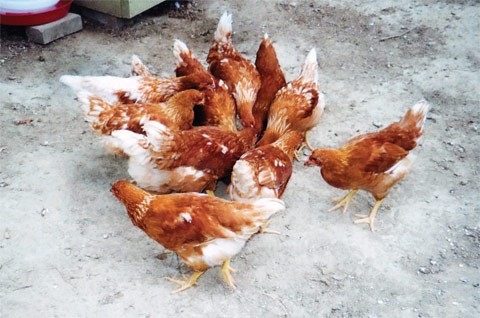
I realized the other day that in our 4+ years of raising chickens, I have never actually researched and chosen specific breeds of chickens for our flock. Mostly this is because we have almost always been given free chickens over the years, and when they are free, you don’t really get to choose. 

I have only bought chicks once, and I basically just got whatever the feed store had that particular day. Back then, I had no idea about chicken breed temperments or egg laying capabilities or anything. The chicks were cute balls of fluff and I didn’t care what they were.

But things are quite a bit different now. I’ve learned a lot more, and we are finally ready to branch out into selling eggs and possibly even breeding our own chickens and eventually raising them for meat (once we’re no longer so focused on building a house, of course). And so even though we have more chickens than we have ever had before (17), we decided it was time to get more! (In case you’ve never been told, chickens are addictive and are a “gateway livestock” animal, or so says this YouTube video I saw years ago. She’s right! 😊)

Of course, this decision was helped by the fact that two of our hens are broody at the moment. We don’t want them to hatch any of our eggs because we don’t want our Silver Phoenix rooster’s genetics. So they are sitting on golf balls. When the time is right, I will get some day-old chicks from the local feed store(s) and that night will switch out the golf balls with chicks and the hens will think the “eggs” hatched and will raise the chicks as her own. 

So the question becomes, “Which breeds should I get?”

I’ve been doing a lot of research and here’s what I’ve come up with.

First of all, when deciding which breeds you want, you need to know what it is you want out of the hens.

For us, it’s primarily eggs. Therefore, any breed that lays less than 200 eggs a year on average are not even being considered.

Also, we like dual purpose breeds. While we don’t have a plan to raise the birds for meat yet we like knowing that our birds will have enough meat on them to make a decent meal if it comes to that. We’re trying to make it our practice here on the homestead that everything serves more than one purpose if possible.

We also like the idea of the heritage breeds, especially the older, established ones. That connection to history is cool. And also, if it’s a true breed and not a hybrid, then when we want to start breeding our own, we can.

They have to be cold hardy. This winter was fairly mild in temps but we can dip down to negative numbers (Fahrenheit) for a few weeks at a time, and I want to make sure our girls can weather the weather just fine. We have a bunch of Leghorns and Leghorn crosses right now, and their large combs did not like even the mild winter we had.

And last but certainly not least, I have to like the breed. There’s gotta be something extra about them to make me consider them. Thus why Rhode Island Reds did not make my list. When I read all over the place that they are an extremely popular bird and “everyone” has them, it immediately makes me not want them. Besides, I think they are kinda boring looking. 🙂

So here’s my list of chickens breeds that I think will be the best ones for us.

Ameraucana hen (image source)

Ameraucana – I have heard varying reports on the number of eggs they lay, but most websites say it is over 200. They are cold hardy, not prone to broodiness, are interesting to look at, and of course, they lay the coolest eggs ever! We have one hen now who has some Ameraucana or Araucana blood in her and I love her blue-green eggs! So while they may not be the most prolific layers, the Ameraucana made it to my list because they are just so darn cool!

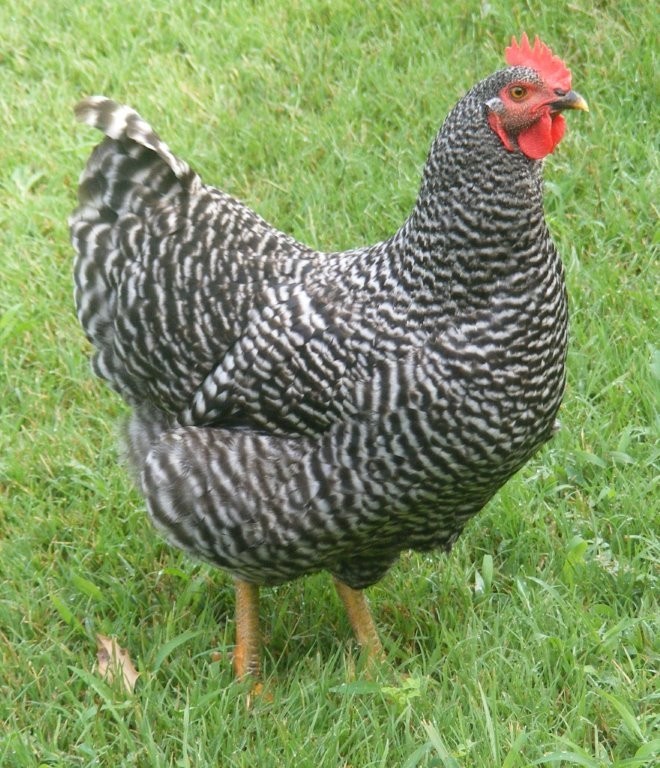
Barred Rock hen (image source)

Barred Rock – the Plymouth Barred Rock is an American dual purpose breed that is cold hardy and lays a ton of eggs (up to 300 in ideal conditions!). It is also a beautiful bird. ‘Nuff said.
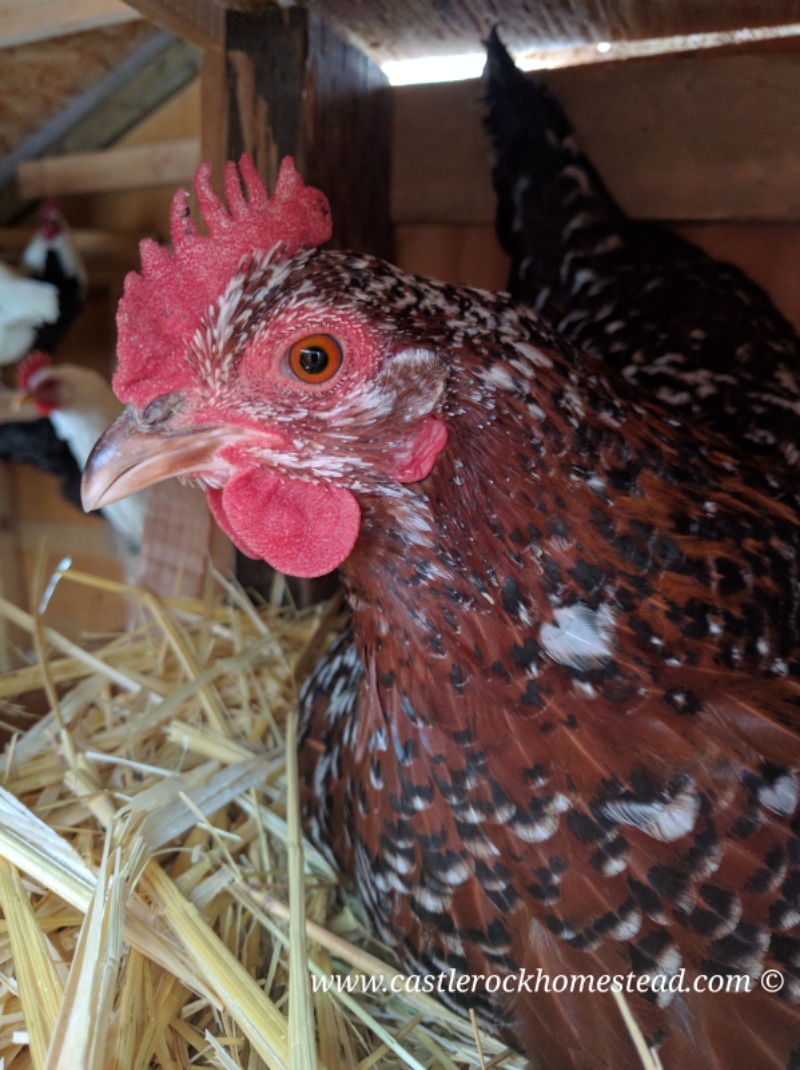
Speckled Sussex hen

Speckled Sussex – see Barred Rock description (Only they are from England) 😁

Delaware hen (image source)

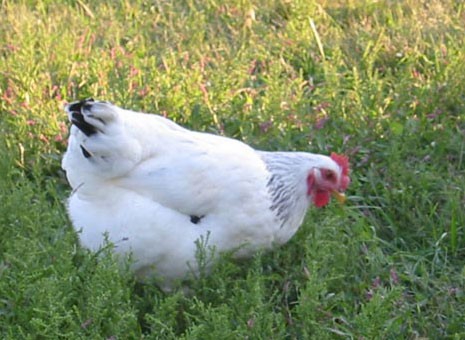
Delaware – they are good layers (200-250), an American dual purpose breed, cold hardy, and beautiful.

Welsummer hen (image source)

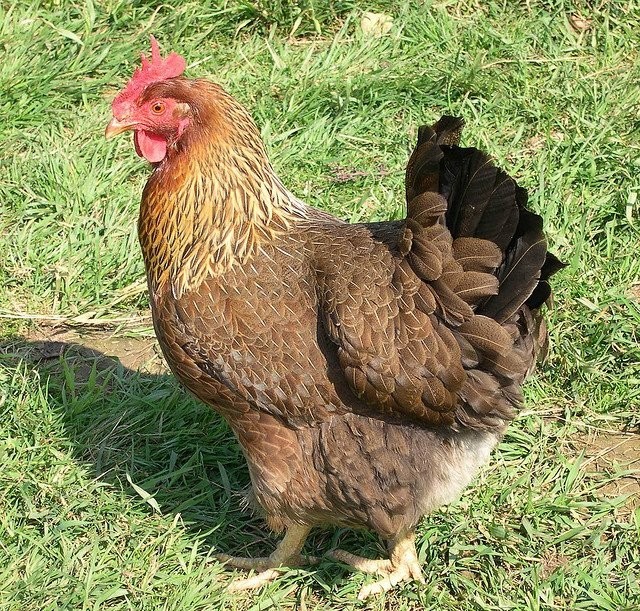
Welsummer – again, a breed I want specifically for the egg color as they lay dark brown eggs. Not quite as dark as the Copper Marans lays, but the Welsummer is cold hardy, where the Marans are not. And the Welsummer is still a decent layer at 200+ eggs per year. They also have the added benefits of being a dual purpose breed that rarely goes broody.

Australorp hens (image source)

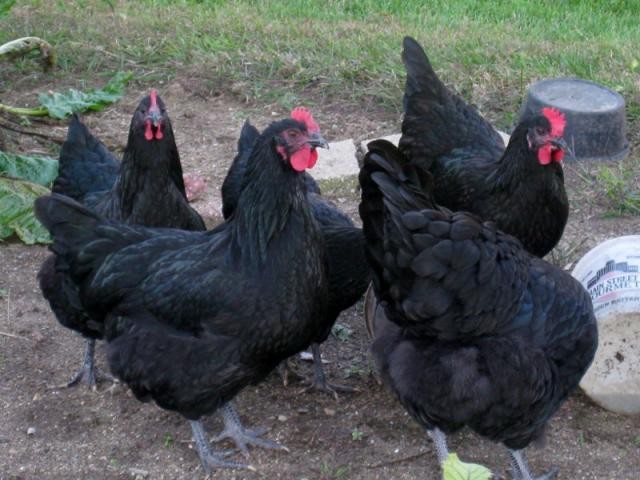
Australorp – these “Australian Orpington” chickens are almost last on my list because there’s not a whole lot to recommend them to me other than the fact that they meet nearly all the requirements. They lay 250+ eggs a year, are cold hardy, and a dual purpose heritage breed. But there’s nothing there that makes them “pop” for me. But if that’s all the store had, I’d take ’em! (Heck, if all I could find were Rhodes Island Reds, I’d take them, too, I guess. 😁)

Sexlink hens (image source)

Sexlink – so, if you’re a long time follower of ours, you might remember that in the fall of 2014, just a few months into our Portland Interlude, we were given  6 chicks. Three ended up being roosters and went bye-bye (some with larger consequenses than others). One of the remaining hens was killed by a neighborhood cat (we think). The other two matured into egg laying machines! Those two hens were the offspring of one of two roosters and any number of hens in a mixed flock. But the savy farmer who wanted more egg laying machines would try to figure out which rooster and hen combo produced these two hens. And then reproduce it. And hey, if you could tell at hatching which chicks were boys and which were girls, all the better, right? That right there is what a Sexlink chicken is. Roosters and hens of different breeds are selectively bred together to get an egg laying machine of a hen. And the cool thing about it is that the chicks are colored in such a way that there is a 100% accuracy rate in telling the boys and the girls apart. And that’s what makes the Sexlink hybrids at least somewhat appealing to me. You know  youre getting hens. No surprises. (Most hatcheries have a 90% accuracy rate at sexing the non-sexlink chicks correctly) But, they are not a heritage breed, meaning if you hatch one of their eggs, the chick will not necessarily have any of the good characteristics you are looking for. But the high volume of eggs, and the fact that you know what gender you’re getting means that I won’t discount them outright.

So that’s our plans. We’re looking to get about a dozen chicks for ourselves and about 4 for my parents. I’ll let you know which breeds we actually end up with when we get them.

Do you have chickens? What breeds do you have? Which are your favorites?

Maridy

Now is the time… Again

The Hubs and I went round and round discussing if we should do it.

On one hand, it’s a great deal.

On the other hand, it represents more work for us.

And yet, could we really pass it up?

Or should we wait till the opportunity rolls around again?

Who’s to say that we’d be any more ready then?

And really, by doing it right now rather than waiting, some parts will actually be easier.

But, ugh, the extra work. And all while trying to build!

And the whole time, this blog post’s message was running through my head. Now is the time!

So what did we do?

We bought the trees.

A local nursery was running a killer deal on fruit trees. We got 5 trees for the price of 2!

Eventually, we want to plant even more fruit trees, but we want to start with root stock and do some grafting, etc. Hubs has been learning all about that stuff. But THAT is definitely a project for later down the road.

For right now? Let’s get some trees in the ground, man! Yes, it means more work, just one more thing (or rather, 5 more things) to take care of. On the other hand, we’re going to have equipment up here soon that will easily and quickly dig the holes for planting, so that will actually make it easier. And we’ve brainstormed a way to make watering a simple task. When we get it set up, we’ll let you know how it works.

When you’re developing property from the ground up and want to end up with a bona fide orchard, you gotta get started ASAP. Fruit trees take a couple years to mature and start producing. As I said in the article I linked to above, if we had actually planted trees when we first started talking about it many years ago, we would have gotten to enjoy those trees for several years before we moved. As it was, we never planted. There was always some excuse. 

And the opportunity was wasted.

And when we finally DID plant a couple trees on our homestead? We up and moved away for two years. But even then, buying and planting those two trees was worth it. We have since moved our house location away from where they are planted, but they are still there and doing well. And they have now had two years in the ground. Two years head start on everything else we plant now.

So when we learned about the sale, we debated and hemmed and hawed, and then we remembered the lessons from three years ago. 

And we bought the trees.

Now is the time. 

Maybe not the perfect time. But it is THE time. 

Because it is never going to be perfect. There will always be some excuse. 

You just gotta make it happen.

So for now, our five little trees (three apple and two cherry) huddle together near the house pad, waiting for us to decide where is the best place to plant them. 

These, the beginning of our orchard.

Oh, the hopes and dreams wrapped up in those few sticks growing out of the dirt in some buckets.

Maridy

Baby Bunny Watch – April 2017

Updated Tuesday, April 4 @ 4:50pm (updates below the original post)

March 30 – So, our last litter of bunnies never happened. Not sure if April and Switch miscarried, or if they never were preggo to begin with, but either way, we were disappointed to see gestation day 31 come and go with no bunnies.

So, after a couple of days to be absolutely certain they just weren’t “late”, we scheduled them to have a date with the boys once again. 

And once again, they are both due in a couple days – providing they are actually pregnant, of course!

Today I put their nest boxes back in with some fresh straw.

April (seen above) immediately jumped in the box and started nesting. Good sign!

Switch was more interested in chewing on the straw. I sat nearby to observe them for a while, and she had yet to get in the box by the time I left. So, I’m not real hopeful there, but I’m not giving up all hope yet. She’s an inexperienced breeder. Could be she just doesn’t know what’s going on with her body yet. We can be optimistic, right?
Signs a rabbit is nearing labor:

-Holding straw in her mouth (not eating it) -maybe because she instinctively wants to build a nest?

-Creating a nest out of bedding and lining it with fur

-Anxiousness, scratching at cage, etc
So far, Switch is showing ZERO signs of being close to the end of pregnancy. April is rather busily building a nest. But then, she built a nest last time and even lined it with fur, and then nuthin’.

So, I guess we’ll just have to wait and see. I’ll update this post as we go along.

Maridy

Update #1 – Sunday, April 2 @ 10:10pm – it’s now the end of day 30. No kits and no signs of labor from either doe. As a reminder, rabbits have a gestation of 30-31 days. When we had her before, April always kindled on day 30. Maybe, just maybe we’ll have kits in the morning or some time tomorrow. 

Update #2 – Tuesday, April 4 @ 4:50pm – it’s now just about evening on gestational day 32 and absolutely nuthin’. This is rather frustrating. I can understand what’s up with April. She’s old. But according to the friend we got the rabbits from, the other three are only a couple years old.There should be no reason why Switch has not gotten pregnant. This homesteader is thinking it may be time for rabbit stew. Or maybe I’ll sell them as pets on Craigslist. I can usually find someone who wants to save them from the stewpot. That would put a bit of extra money in our pocket, and save us the trouble of butchering 4 rabbits. Don’t think the process of setting everything up, doing the butchering, processing the meat, and then cleaning everything up is worth it for only 4 rabbits. Especially since we’d have to can most of the meat as we don’t have space in our freezer. And that takes quite a lot of time. The Hubs may disagree, though, so I guess we’ll see. But at any rate, there are no baby bunnies, and I’m rather disappointed.

Will this winter ever end??

3-5-17 Snowing again

This past week, we had a few days of dry, sunny weather. The birds started singing again. The trees started budding again. And Spring seemed just around the corner.

And now we’re 5 inches deep in snow again. I know, I know, that’s not much compared to some (we have friends who live higher up in the mountains who literally have a tunnel through the snow to their front door!)

But for us, at the elevation we live, in the particular mountain range we are in, 5 inches is…Well, it still isn’t much. But it’s the 10th or so storm system to move through since New Years. That’s more than one system per week. In a place that normally gets less than 10 inches of precipitation annually, that’s saying something. 

The wettest winter in our area in the last 50+ years, and we’re trying to build a house. Last year, while we were still sitting up in Oregon eagerly awaiting our return to the homestead, they had roughly 5 storms the entire winter here. This year, it’s just one after the other.

So, what are we doing about it?

Well, there’s not much we can do. God brings the storms in his timing. All we can do is trust him that he has a purpose for the delay. And maybe learn something in the waiting.

The Danish have a word: hygge. It loosely translated as “cozy” or “coziness” but from my understanding it is so much more than just that. “In essence, hygge means creating a warm atmosphere and enjoying the good things in life…Hygge is a philosophy; a way of life that has helped Danes understand the importance of simplicity, time to unwind and slowing down the pace of life.” (Source)

I feel like this winter has been one of discovering and reveling in hygge.

Today, as I sit in my cozy trailer with my chai tea latte and watch the snow fall, I contemplate the rest I have been given this winter. Had we been able to get the shell of the house up this Fall like we had wanted to, we would have been busy, busy, busy building over the winter. But that did not happen, and instead, we’ve had long periods of forced inactivity. (Well, there’s still animals and the family to take care of, and normal day-to-day stuff, but you know what I mean. If we were building, and when we DO build, we will have to do all that on  top of building our house.)
So, this winter, in my spare time, I taught myself to crochet. I’ve always wanted to learn how, and I finally have the time. In fact, as soon as I’m done with this post, that’s what I’m gonna be doing.

In my warm tiny home. With my 4 year old snuggling next to me on the couch. Candles lit, and relaxing music playing. On this snowy winter day. Hygge all the way, baby!

One of these days, things will dry out and we’ll start construction on our house. Life will get crazy busy and hectic. But today is not that day. And there’s a teeny bit of me that hopes winter lasts another two months. 

Stay warm and cozy, my friends.

Maridy

Baby bunny watch, Feb/Mar 2017

February 28, 2017 (UPDATED (for the final time) March 31 @ 2:40pm (updates below original post)

In light of April the Giraffe gaining so much popularity as she approaches the birth of her baby, I thought I’d do a little baby watch myself.

We bred our two female rabbits 30 days ago, which means they are due to kindle (have their babies) today or tomorrow. Rabbits are quick like that (whereas giraffes are pregnant for 15 months!)

April (yes, same name as the giraffe) is our oldest rabbit at almost 6 years old. We bred her to our white and black male, Ollie, in the hopes of producing a solid white bunny or two. We weren’t expecting much, since she’s so ancient (in rabbit breeding years), but she seems to be preparing for birth by lining her nest box with fur.

Rabbits do this since the kits (baby rabbits) are born hairless. Mamma’s fur insulates them and keeps them warm. Mamma rabbits do not set on the nest to keep the kits warm as chickens do, so it is essential that there is plenty of fur in the box. April is an experienced mamma, so I’m hoping this means that her kits are going to make an appearance today or tomorrow.

Switch is our other, younger, doe (female rabbit). We bred her to our solid black male, Vader, in the hopes of getting a solid black bunny or two. She has not stripped her fur yet, but some rabbits don’t prepare for birth until just before it happens, so we’re still hopeful that she is indeed pregnant. 

Some of our regular followers might remember that we were expecting bunnies at Christmas since the boys and girls got to play together for several days. I put in the nest boxes a couple days before their due date, but nothing ever happened. Not even any fur lining. It’s disappointing when you are so eager for something like the birth of baby bunnies only to find out it’s not gonna happen.

And as a homesteader, who wants to depend on the breeding program for food as part of our ever increasing sustaniable lifestyle, it can also be downright frustrating. And hard to wait a full month just to know if it even worked or not.

On the other hand, at least they are not cows or sheep or giraffe who all take nearly a year or more to have a baby! I guess waiting 30 days is not all that bad in the grand scheme of things.

I will keep you updated over the next day or two. Hopefully we’ll have some good news to tell soon!

UPDATES:

9:45PM – Heading toward bed and shutting down the animals for the night and still nothing. Actually there is something.

Poop.

That’s what there is.

Poop.

I have never known a mamma to foul up her nest box and then have babies in it. Usually they keep it very clean if they are going to kindle in it. I’m beginning to think we have two non-pregnant rabbits on our hands. Grrrr…

March 1, 5:15pm – Still nothing…. really beginning to doubt… 😦

Much later update: March 31, 2:40pm – much like April the Giraffe, our rabbits never did have babies. UNLIKE the giraffe, who may still give birth at any moment, once a rabbit passes about day 34 gestation, you can be assured that she will not give birth (either never was pregnant or miscarried). So, once we were sure they were not indeed pregnant, we had the girls visit their boyfriends again. “April” and “Switch” are due in a couple days, so if you want to follow along, here’s Baby Bunny Watch, April 2017 

This awesome hack will save your pant cuffs!

OK, I know the title of this post sounds like click bait, but it’s really true. Today I did one of those simple little things that had me saying, “No way! Why didn’t I think of that sooner?”

You see, all this winter as I’ve been bundled up working outside, I have been frustrated with the cuffs on my insulated pants. The legs are too long and the edges would get nasty in the mud and dirt.

Too long pants

In fact, the cuffs are even starting to fray. And that’s just really annoying.
Often I would just roll then up, which looks silly, but whatever. 

This works if  there’s not a ton of mud or it’s not actively raining, both of which I was dealing with today. The mud gets on the inside of the pants if they are rolled up like that while working in mud, and the water gets trapped in the cuffs if it’s raining.

What’s a girl to do?

Then I had an epiphany!

Elastic cuffs! It’s kinda hard to see in the pic since my elastic is the same color as my pants, but I found some wide elastic and wrapped it around the outside of my pant cuffs.

I didn’t even sew them. Just used a big safety pin on each one.

External elastic pant cuff

So simple. Just a couple items and my pant legs didn’t bother me all day!

I’m thinking this same idea would work with Velcro, or string, or even a thick rubber band. 

I’m just wondering why it took me all winter to think of it! 🤣

Rain, rain, go away

February 7 – Rainy day

What a winter this has been so far! We had a small snow storm just before Christmas and knew that we NEEDED to get our mudroom built. The day after Christmas, we started building it. We got the roof on just before the next bigger snow on January 4th. And we’ve had back-to-back snow and rain systems since then. In fact, as I sit here typing this, it is pouring outside. We’re supposed to get about 15% of our  yearly rainfall in this one storm. And we’ve already gotten over half in the last month alone. The bigger mountains around us have the most snow anyone living there has ever seen. What a blessing that mudroom has been.

January 5 – got the roof on just in time for the next snowstorm

Since the push to get the roof on, we’ve slowly been finishing up as we have time and inclination.

January 6 – enclosing the last bit of wall section. I always was a monkey.

January 6 – the fun-ness of construction in the winter – scraping ice off your materials

January 9 – the snow is gone, the rains have come. Time to add the gutter and rain barrels.

January 13 – oh look, more snow. And the beginnings of a door for the mudroom.

January 17 – still snowy – working on a floor for the mudroom

January 17 – mudroom floor before. At least when I was doing this project, the ground was mostly frozen, not the gushy quagmire it had been.

January 17 – mudroom floor after. We used heavy duty shipping pallets we found on Craiglist.

Once the floor was in, the mudroom was just about completed. It took us three weeks to build something that should have only taken one. But that’s construction in the winter for ya. The Hubby is toying around with a small wood stove to put in there so that on days like today (rain, rain, rain), we have a place to dry things out if need be. But even without a woodstove in there, it’s so very nice to have a place to kick off your wet and/or muddy shoes before coming in the trailer. It also keeps our fridge protected from the elements.

January 23 – speaking of the elements…more snow! There are three more solar panels under there somewhere.

We had a few days of warmer and drier weather over the past week and were able to get a few other projects done.

January 30 – sunshine! A beautiful day to clean out the chicken coop.

February 4 – more sunshine (but very windy) – finally built some steps into the hillside between Pajii’s trailer and ours. That will come in handy the next time it’s covered in snow. Slipping and sliding is fun when sledding, not so much when carrying dinner to your father-in-law’s house.

February 6 – despite the bone chilling wind (45mph), Princess Girl and I put up a fence around the rabbit hutch to keep the neighbor dogs out. Just glad it wasn’t raining like today.

So, at the rate this winter is going, it’s looking like things won’t dry out till March or possibly April. Hopefully no longer than that. In the meantime, we are planning and dreaming and looking forward to the day we can start construction on our house. 

And on days like today, when my plans for the day were ruined because of the rain, I see it as time to relax, and catch up on other projects that get put off too often. You know, like dishes. 😉

I hope you enjoy your day, no matter what the weather is where you are.

Granola Recipe

Back this summer I learned to make my own granola and we are loving it! I made up another big batch today, so figured it was a good time to give you my recipe.

img_20160928_102114

Making Granola in the early autumn sunshine with a borrowed solar oven.

I have spent countless minutes in the grocery store reading ingredient labels on granola packages and still ended up having to accept some ingredients I did not like in order to have the convenience of a cold cereal that is at least somewhat healthier for you.

So I decided to make my own. From be able to use whatever flavors you want to being able to control the quantity and quality of the ingredients, it just makes sense to make your own. Below is the recipe that I make every couple of months. Every time we run out, the Hubs gets a sad face and continually asks for me to make up another batch.

Oh, and speaking of the Hubby, did you see the post he did the other day about flashlights? I was so proud of him for taking the initiative to write up a post for this here blog. Ain’t my man great? 😉

I digress…

The recipe:

Homemade Granola

  • 6-ish cups Old Fashioned oats
  • 4-ish cups nuts or seeds of choice, chopped small
  • 1-ish cup chia seeds
  • 4-ish tsp Cinnamon
  • 2-ish tsp salt
  • 1-ish cup pure maple syrup
  • 3/4-ish cup coconut oil
  • 2-ish tsp real vanilla
  • 1-2 cups raisins
  • 1-2 cups unsweetened coconut flakes

Directions: Place all ingredients except for the coconut flakes and raisins in a large bowl and mix thoroughly. Once mixed, spread a 1 inch portion of the uncooked granola onto a baking sheet and bake in the oven at 300 degrees for about 15 minutes. Stir the granola and bake for an additional 5-10 minutes or until the granola is just barely lightly browned. Empty that panfull into a large bowl and repeat with more granola until the entire batch has been cooked (it takes me four 9×13 pans to cook this amount. You could do it one at a time or if your oven is big enough, all at once – lucky you!) Add the coconut flakes and raisins and mix completely. Let cool and store in an airtight gallon sized container (I use 2 half-gallon jars). Enjoy by the handful or with milk. And feel free to experiment next time.

Notes:

-As you can tell by all “ish” statements, I tend not to measure my ingredients very precisely. I just scoop or pour till it looks about right. 🙂 This recipe is very forgiving that way.

-Nuts: I usually use sliced almonds and chopped walnuts. Lately I’ve been putting in raw pumpkin seeds as well. This time I even added a bit of flax seeds. Whatever seems good at the time and to ramp up the nutritional value. If you really want to be uber healthy, you should soak the nuts ahead of time. I have never done this, mainly because I never think about it ahead of time. It sounds really easy to do, just takes some planning.

-Other recipes will tell you to add the coconut flakes in at the beginning or midway through for a “toasted coconut” flavor. I found that by doing that, I lost the coconutty flavor. So I just add it at the end with the raisins (which don’t taste good baked in my opinion – they get too dried out).

-Feel free to make substitutions as needed/wanted. Your results may vary from mine, but that’s what making your own food from scratch is all about, making it the way YOU want it. Want to use regular oats, not old fashioned? Go for it! Want to play with the ratio of oats to nuts? Awesome! Can’t stand coconut? Leave it out. Make it yours!

-A note about price. Obviously the price of your ingredients is going to affect the price of this granola. I have found that it is not really any cheaper to make my own than a good quality store bought, mainly because I use so many nuts, which are expensive. But, and that’s the most important “but”, I can make it exactly how I want it with the exact ingredients I want. I get to control everything that goes into it. And that is worth more than the price tag.

Well, there you go. I finally got my granola recipe up here for y’all, as I said I was going to in a facebook post way back in August!

I hope you enjoy.