Tag Archives: Tiny Home

How we do this Off-Grid thing

So you all know we live “off-grid” on our homestead in our trailers and are building our house to be off-grid as well.

But what does that mean?

It does not mean that we are completely independent from modern conveniences. I mean, I do drive a vehicle (more than I want to, I admit). We heat our trailers with propane. And there are times our little temporary solar system just does not cut it and we need to run the generator to charge the batteries. Like when the sun hasn’t come out for days.

Or, like today, when we did have some sun, but I didn’t get laundry out on the line in time for it to dry and needed to use the generator to run the clothes dryer.

It’s times like this that I’m very glad for modern conveniences like generators and the gasoline needed to run them.

Big generator pulled up to the well shed to run the dryer

Our washer can run on our small solar system, but the dryer requires more power.

BTW this is how we vent the dryer. We don’t want to put a hole in the shed wall since this is temporary until we can move the washer and dryer into the house. We also route the washer drain out this window.

So, yeah, for us, living off-grid does not mean that we do not rely on the grid. We are not one of those families who live in the wilderness, eating only what we can hunt or gather or grow, heating our house only with wood we can gather, etc. Not by a long shot!

But it does mean that we produce about 90% of our daily (not construction) power needs through our solar system. (And once we are living in the house it will be even more since our solar system will be larger.) And we stock up on propane and gasoline when the storms are threatening. It means that in an emergency situation, we could live quite comfortably for quite a while. And in a long term situation, we could get by without the backup generators if we ran out of gas. Yeah, it might mean not watching TV, and having to do essential bits of laundry by hand and hanging it to dry in front of the fire in the house, but we’d get by till the sun came back out. Way better than most people who rely completely on the grid. For us, it’s about being as self sufficient as is feasible in our current lifestyle. I also like the idea that by using mostly solar power, we are reducing our carbon footprint.

Now, to just get this house built so that we can focus on producing our own food again and be even more sustainable. 😁

Healthier Hot Chocolate (Only 3 ingredients!)

There’s nothing like playing hard in the snow, then coming inside to a steaming cup of hot chocolate.

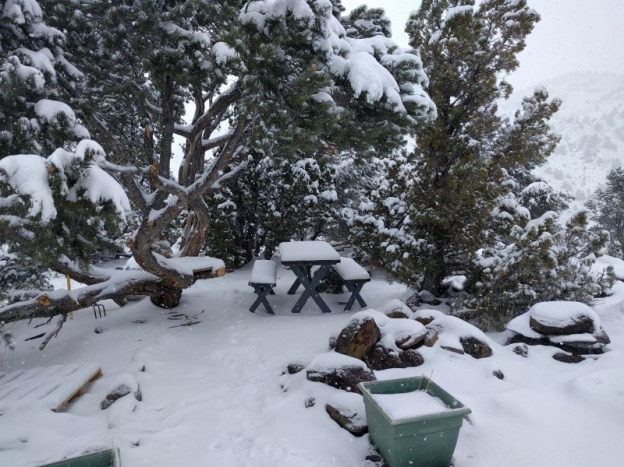
It snowed again last night, the most snow we’ve had all winter.

The girls and I took the opportunity to get in some good old fashioned snow play.

When we came in for some hot chocolate, I realized we were dangerously low on our home made hot chocolate mix. But it was no big deal, because with only three ingredients, this hot chocolate mix goes together in a jiffy.

You read that right: three ingredients. This version is so much healthier than any store-bought hot chocolate I’ve found. And depending on what sweetener you use, you can make it even healthier. I’ve seen many other hot chocolate recipes what use more ingredients, and you certainly can add in flavorings of your choice, but we prefer to keep it simple. You can also omit the dried milk and add the cocoa and sweetener to whatever milk you normally drink. I like to have the milk in the mix, however, mainly because we don’t have a microwave, so heating milk on the stove means dirtying a dish. And we avoid that at all costs. Especially in the winter when our water system in the trailer is a bit more labor intensive. But also, I like to make up a big batch of this and have it on hand to drink, no matter how much milk is in the fridge.

Ok, I’ve talked long enough. Here’s the recipe.

Homemade Healthier Hot Chocolate

One serving:

  • 1 Tablespoon unsweetened cocoa powder
  • 1 Tablespoon sugar/sweetener
  • of your choice
  • 1/4 cup (heaping) dry milk

Put all ingredients in a mug and mix them together, add 6-8oz hot water, stir till all ingredients are dissolved.

One quart of MIX:

  • 1/2 cup unsweetened cocoa powder
  • 1/2 cup sugar/sweetener of your choice
  • 2½ cups dry milk

Put all ingredients into a bowl and mix well. Then pour into a quart size container, label and place in the pantry/cupboard ,etc for later use. To use, place 3-4 large spoonfuls of hot chocolate mix into a mug, add 6-8oz hot water, stir till dissolved.

Notes:

  • Add more or less mix and/or water to achieve desired taste.
  • Mixing all the ingredients together before adding the hot water helps the cocoa not form so many clumps.
  • Feel free to use whatever sweetener you prefer. You may need to play with the ratios a bit, though. We typically use raw cane sugar, but we’ve also used coconut sugar and pure maple syrup. If you prefer to use a liquid sweetener, you’ll need to put that in at the same time as the hot water.

How do we…stay warm

It snailed today.

Yes, you read that right. It’s not a typo.

And, no, it doesn’t have anything to do with slimy little creatures with shells on their backs.

See that “snow” on the straw bales? It’s actually hail.

Get it? Snow + hail = snail. I’m so puny.

See? Little tiny hailstones. But it was cold enough today for it to have been snow.

Never even made it to 50° outside. Probably going to have our first freeze tonight.

The weather brings to mind a question we get asked every time the temperatures plummet. And since we turned on our heater today for the first time this season, I figured it was a good time to answer everyone’s most pressing question.

Do we stay warm enough in the winter?

The answer is, “Of course!”

The the real truth of the matter, however, is that YOU might not think so, but we stay plenty warm. Relatively.

Yes, it’s a relative answer. WE think we stay plenty warm, but most people who live in climate controlled comfort would be rather uncomfortable at times. Case in point, as I sit here this evening and write this post, the thermometer is showing that it is 59° in the trailer. Now that is pretty chilly, I will admit. And I am about to turn on the heater to take off the chill before we turn in for the night. However, if we were not headed into a sub-freezing night, I wouldn’t bother. I’m just about perfectly comfortable as I sit here and type. How? I’ll share with you some of our tips to stay warm in the winter.

Tip #1: Your attitude affects your temperature. Ok, so I don’t know for sure if having the right attitude can actually physiologically affect how warm you feel, but it sure seems that way. We CHOOSE to live closer to the changing seasons. By having a cooler house in winter and hotter house in summer, not only are we saving money on heating and cooling bills, but we are more connected to the outdoors and the seasonal changes around us. We LIKE the changing seasons and don’t want to insulate ourselves from them too much. And honestly, you get used to it after a little while. I’m sure you’ve all heard of those people who live in Alaska coming down to the lower 48 and thinking it feels like summer when everyone else is all bundled up? Yeah, it’s like that. You can get used to anything. We chose to get used to colder temperatures in the winter.

Tip #2: Layers! I nearly roll my eyes every time I hear someone complaining that it’s cold at 65° when all they are wearing is shorts and a t-shirt. Unless you are one of those people from Alaska that I just mentioned, or you are doing physical work, yeah, you’re going to get chilled at that temperature. Go put some more clothes on. Throw a blanket around your shoulders. Something to help your body stay warm. And remember that your blood circulates through your whole body. So even if your legs themselves don’t feel particularly cold in shorts, your blood is getting cooled as it travels through them and contributing to your feeling of chilliness. Most people that I know just go bump up the heat a few degrees if they feel cold. We choose to put on more layers of clothing. It’s kinda nice having a whole different wardrobe in the winter. “New” clothes every 6 months. Woo-hoo! Oh, and this goes for night clothes as well. In cold weather, we bundle up to go to bed, often wearing a hoodie to keep our heads warm as well. I even made Flower Girl a sleep sack so that she stays warm enough, even if she kicks the covers off. It is basically a fleece nightgown that is long enough that it has a closure at her feet. Kinda like a combination nightgown and fleece sleeping bag. I am hoping she hasn’t grown out of it yet.

Tip #3 – Get moving! Want to warm up quick? Do some physical exercise. When we lived downtown, I would run up and down the stairs several times to warm up in a hurry. Even light housework like picking up toys, etc will get the blood flowing and warm you up.

Tip #4 – Auxiliary heat source. When we lived on the grid, I used to keep space heaters strategically located around the house so that when I got chilled, I could cuddle up in front of one. Living off-grid in a camping trailer now, that is not really an option. But you know what works great? Hot water bottles.

We got these last fall and Christmas and we use them All. The. Time. when the temps are cold. I have a problem with my feet getting cold before bed. And when my feet are cold, I just can’t feel warm. So I heat up my hot water bottle, put it at my feet in bed, and drift off to sleep in cozy warmth. They also work well to sooth sore muscles and relieve monthly cramping.

Tip #5 – Turn on the heat when you need to. So yes, we have a heat source in our trailer. And yes, we do use it when it gets cold. It is a propane fueled catalytic heater made by Mr Heater. The one we have is the Big Buddy.

Rarely do we ever have to turn that baby up on high. When we do, we have to turn it back down to low real soon or get heated out of the trailer. Even on low, it is capable of keeping us too warm – see the picture of our temperature reading earlier in this post. It was 74° inside because I was busy and hadn’t turned off the heater.

And in case you were worried, yes, we have a carbon monoxide detector. And no, we do not typically run the heater at night while we are sleeping. These heaters are supposed to be safe to run inside, but we’d rather be safe than sorry.

So yes, we stay plenty warm here in our little trailer on our mountain homestead. And if it’s chilly inside, it’s because we choose to have it that way. Because we’re different like that. But then, you probably already knew that.

Stay warm, my friends. And thanks for reading.

The end is coming

It rained yesterday. I mean, a good ol’ gully washer! Rain coming down in sheets. Hail. Overflowing rain barrels (which we coincidentally had just filled up with well water because we use them to water our animals and they were getting low and who knew it was going to pour?) It was glorious.

And this morning I am reminded that the end is near.

The end of summer.

Because of the rain yesterday, the air is cooler than usual this morning, and fresh. The cheatgrass all around me is doing its usual end of summer imitation of fall colors. And September is right around the corner.

Normally I love Autumn. It’s my favorite season. However this year, we’re feeling the heat (haha) to get our house dried in before the cold weather hits.

But things keep delaying us. Last week it was that we couldn’t find any delivery drivers to bring in backfill for us. This week, we got the dirt to put into the inside of the footers, only to be stopped by the weather (can’t do anything on the house pad when there’s 3 inches of mud).

So we take it as a sign that we need to work on other things.

Hubs and I have been working fairly steadily getting our well shed finished off this past week.

Pajii graciously plunked down the money to get a shed for us so that we can put a water system in there so we can have water on site for the winter.

We had it made with 2×6 walls so we could put thicker insulation in it (R-19). We also had them beef up the floor since we are going to put heavy totes of water in there.

Then Hubs and I added windows (we could put them in for cheaper than having the shed company put them in), a loft, wiring, insulation, and we are working on the wall panels and trim now.

It might seem like a departure from our true goal of building our house, but we see it as necessary for several reasons.

The first is that it’s become glaringly obvious that we’re going to be spending another winter in the trailers. Last winter, the water situation was rough. We only had as much water on hand as could be stored in jugs inside the trailers. Anything that was stored outside in barrels or totes was almost always a solid block of ice. By insulating the shed and putting a heating source in there, we can store totes of water in there and keep them from freezing. It also gives us a chance to go ahead and get our water filtration system up and running so we can actually drink our well water. The shed will also give us a place to put a washing machine on the homestead which we haven’t had since last summer (been hauling laundry to the laundromat).

The second reason why we are pushing to get the well shed finished is because, well, we can’t do anything on the house right now anyway.

And thirdly, it’s giving us, especially my hubby who’s never built a house before, some crucial experience that will be extremely useful when we do finally get around to building the house.

So we work on the shed. And the “end” is in site. I’d say by the end of this week we should be pretty much finished.

And then, Lord willing, we start back up on the house again.

For now, here’s pics of our progress with finishing out the shed.

Putting up the 2×6 boards as floor joists for the loft.

We sheeted the floor of the loft with some of the 3/4″ plywood we had left over from building our house footings forms.

We framed out three new windows (two upstairs in the loft and one downstairs).

Hubs cutting out the hole for the south facing window in the loft.

Hanging out the tiny window like that makes it look like a child’s play house.

Once we had the floor in for the loft and the two windows put in up there for ventilation, we worked on insulating the downstairs floor. This 2″ thick rigid foam is the same stuff we put around the outside of our house footers. With the two sheets of 3/4″ plywood (one under and one over) it adds up to about R-12 on the floors. Not a lot of insulation, but it is better than having an uninsulated floor for sure.

Got the flooring down.

What could go wrong? And yes, that’s me. Working on trimming the windows.

Wiring. We’ll have one light on the ceiling of the downstairs, a GFCI outlet on each wall, and two outlets upstairs, one of which will be controlled by a light switch.

Flower Girl actually was a big help running the wiring through the holes in the loft.

She’s getting old enough that she’s becoming an actual help at times.

Insulation time! We wanted to get the loft insulated first so that it would cut down on the heat transfer to the whole shed. What a difference!

Insulation is all done, time to start putting up paneling. We decided to go with natural wood bead board for a couple reasons. First of all, we like the look. Second of all, when you factor in things like tape and texture and paint, the bead board was not much more expensive than sheetrock, especially for a small project like this. Thirdly, we like the look.

Paneling all installed in the loft. Just gotta put in trim to hide the seams. In retrospect, we could/should have done things a bit different to have fewer seams, but we learned a ton and will do better in the downstairs.

Besides, the girls don’t know it yet, but the loft is going to become their playroom (and a play room doesn’t need to have perfect paneling). That’s what these colorful foam flooring pieces that we got from a friend which are drying out after being washed off are for. (Was that a confusing sentence or what! Too tired to fix it, though.) Those will be the flooring for the loft to cushion it for the girls. At the moment, they think it’s going to be a storage room. But as I said, it’s become obvious that we are going to spend another winter in the trailers. It will be nice to have a space that the girls can go play where we’re not all right on top of each other. And we can see Princess Girl using it a lot this school year as a quite place to go to do her school work. She is easily distracted and when we live in such a tiny space, it’s hard to find somewhere to concentrate.

Insulating the ceiling of the downstairs. Since we are going to have our water system in there, we want it as insulated as possible so it’s easy to heat so nothing freezes.

Downstairs insulation finished and starting on the paneling.

And that’s as far as we’ve gotten. I’ll post more as we progress.

Raising chicks while living off-grid

So yeah. I’m a sucker for chicks. That is a fully established fact.

Yup. That’s two MORE chicks to add to our menagerie.

I was not planning on buying more chicks. But the feed store I was in had these 5 week old Ameraucanas for sale for only $2 more than they were selling brand new chicks.

And two of our four Ameraucana chicks had died (being crushed) within the first week. I really wanted more Ameraucanas. So when I saw these 5 week old chicks, who are almost the same age as our original chicks, and at a reasonable price?

Well, how could I resist?

[Did I mention that I went to that feed store, miles out of my way,  because I heard they had 5 week old Ameraucanas? No? Oh, well, that will be our little secret, k?]

So as Flower Girl sat in the parking strip grass next to the laundromat today, cuddling one of the new chickies, I figured it was high time to detail out how we have raised our chicks while living off-grid in a camping trailer.

She’s the chicken whisperer for sure!

On April 19, we brought our first chicks home and fostered them to a broody hen who had been sitting on golf balls for about 6 weeks. It worked great. You can read that post HERE

A few days later we tried again with another broody hen. It didn’t work at all. So we had to implement our backup plan.

We knew we needed to raise these chicks in a brooder. We had just emptied a large plastic tote, so that would work perfect. But there was no way that our solar power system could run a traditional heat lamp.

As the weather warmed up, we were able to use the warmth of the sun during the day. 

Solar powered warmth for the chicks – at least on sunny days 😊 (PS, this pic was take  after we got our bantams – the original chicks were about 10 days old, and the bantams ranged from less than a week old to about 2ish weeks old)

But what about at night? Or when it was overcast or cold? Sure, their brooder box would be in the mud room, out of the elements, but April in Northern Nevada is still pretty chilly. Too chilly for newly hatched chicks.

I had seen some warming plates online that advertised that they only use 15watts, but even with Amazon’s 2-day shipping, it would still be several nights before we could get one and set it up. 

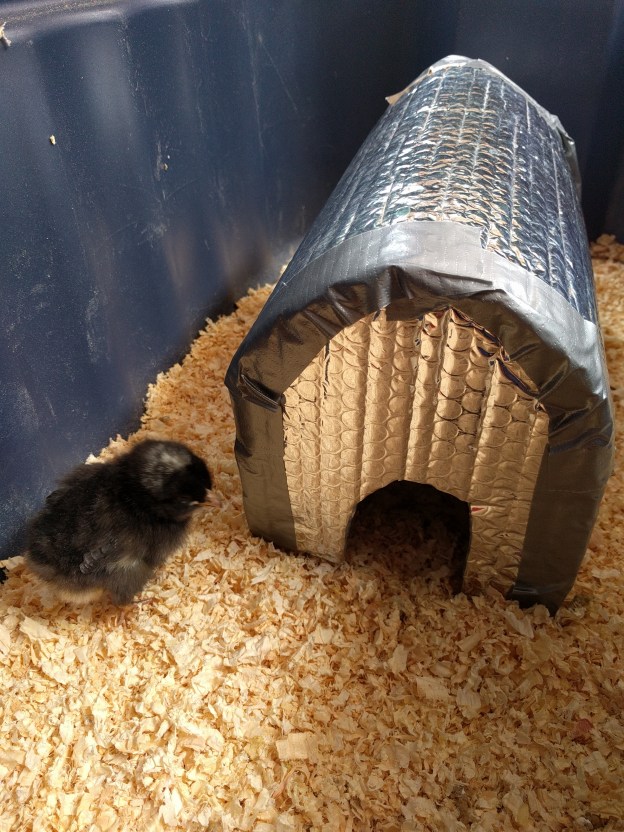
So, to keep our little chickies warm, we built a little hut out of some reflectix we had laying around. (Reflectix is a insulative mylar and bubble wrap material, basically what a lot of car windshield shades are made from.)

Reflectix hut inside the brooder box

We cut a hole just big enough for the chicks to get in and out.

So we had the hut made, but we still needed a heat source. So, we heated some water and put it in a quart size canning jar and placed it in the warming hut, making sure that the door was not blocked so the chicks could get in and out.

The hut was sized just right so that a quart size jar and 6 chicks could all fit in the hut together.

This worked great, except that the water needed to be reheated every 4 hours. Even in the middle of the night. Which meant that for three nights, I was getting up at 2am to reheat the water for the chicks. 

It reminded me of middle of the night feedings of the girls when they were babies. 😄

So after three nights of getting up at 2am, I was very glad to see this come in the mail. (This is not an affiliate link. I am not being paid or reimbursed or compensated by Amazon or Premier. I’m just giving an honest review of a product I actually bought.)

Warming plate for chicks

The under side gets to be about 110°F, just a bit warmer than a mamma hen. It’s easily adjustable in height to accommodate growing chicks, and advertised that it only takes 15 watts to run. 

Considering we are set up on solar power, and this would be running all night, a minimal power draw was essential. But we were skeptical, especially seeing that it was designed for a 220volt system (maybe because it’s made in Germany?) and we are running 110 through our inverter.

But we plugged it in and gave it a go. 

And it worked as advertised. Actually, the power consumption was even less. We hooked it up to our power meter, and it never drew more than 12watts. It and the refergerator could run all night long on our battery bank no problem. Providing the batteries were fully charged, of course.

When the chicks were about 3 weeks old, we got a new (to us) little coop and decided to put the chicks out there. The warming plate went with them, of course.

See the orange extension cord going through the closed window? That’s for the warming plate​ inside.

(Edited to add this photo since I finally found it.)


When they were between 4 and 5 weeks old, I noticed that they were no longer sleeping under the plate at right, rather preferring to cuddle up in a corner. After several nights of that, and with overnight lows expected to hold steady for a while, I turned off the warming plate. They haven’t needed it since. Even our smallest chick, our bantam frizzle, who is still so very tiny, would snuggle her way into the middle of the pile to stay warm. I thought for sure she’d be crushed. But she’s a tough little thing. (As a side note, at 4 weeks was also about the time our mamma hen stopped mothering the chicks in the other flock. Seems 4-5 weeks is the magic age for chicks to be mature enough to “be on their own”.)

The chicks are now between 6 and 7 weeks old (except for our newest ones who are 5ish weeks). They recently got a small run to roam around in outside.

New small run on the Brooder Coop

Soon we’ll start letting them free range in the afternoons with all the other hens and chicks (and Cogburn the Rooster). And this week, the bantams are going to their new home at my parents’ house (that’s been the plan all along), so there will be more room for everyone as they continue to grow. 

So there you have it. How we raised chicks in a brooder while living in a camping trailer off-grid. 

And now the question begs to be asked. Which way do I prefer – letting a mamma hen raise the chicks or raising them in a brooder? Honestly, I can’t decide. There are pros and cons to both systems, especially the way we have things set up here. Let me think on it and get back to you, k? 😉

Will this winter ever end??

3-5-17 Snowing again

This past week, we had a few days of dry, sunny weather. The birds started singing again. The trees started budding again. And Spring seemed just around the corner.

And now we’re 5 inches deep in snow again. I know, I know, that’s not much compared to some (we have friends who live higher up in the mountains who literally have a tunnel through the snow to their front door!)

But for us, at the elevation we live, in the particular mountain range we are in, 5 inches is…Well, it still isn’t much. But it’s the 10th or so storm system to move through since New Years. That’s more than one system per week. In a place that normally gets less than 10 inches of precipitation annually, that’s saying something. 

The wettest winter in our area in the last 50+ years, and we’re trying to build a house. Last year, while we were still sitting up in Oregon eagerly awaiting our return to the homestead, they had roughly 5 storms the entire winter here. This year, it’s just one after the other.

So, what are we doing about it?

Well, there’s not much we can do. God brings the storms in his timing. All we can do is trust him that he has a purpose for the delay. And maybe learn something in the waiting.

The Danish have a word: hygge. It loosely translated as “cozy” or “coziness” but from my understanding it is so much more than just that. “In essence, hygge means creating a warm atmosphere and enjoying the good things in life…Hygge is a philosophy; a way of life that has helped Danes understand the importance of simplicity, time to unwind and slowing down the pace of life.” (Source)

I feel like this winter has been one of discovering and reveling in hygge.

Today, as I sit in my cozy trailer with my chai tea latte and watch the snow fall, I contemplate the rest I have been given this winter. Had we been able to get the shell of the house up this Fall like we had wanted to, we would have been busy, busy, busy building over the winter. But that did not happen, and instead, we’ve had long periods of forced inactivity. (Well, there’s still animals and the family to take care of, and normal day-to-day stuff, but you know what I mean. If we were building, and when we DO build, we will have to do all that on  top of building our house.)
So, this winter, in my spare time, I taught myself to crochet. I’ve always wanted to learn how, and I finally have the time. In fact, as soon as I’m done with this post, that’s what I’m gonna be doing.

In my warm tiny home. With my 4 year old snuggling next to me on the couch. Candles lit, and relaxing music playing. On this snowy winter day. Hygge all the way, baby!

One of these days, things will dry out and we’ll start construction on our house. Life will get crazy busy and hectic. But today is not that day. And there’s a teeny bit of me that hopes winter lasts another two months. 

Stay warm and cozy, my friends.

Maridy

Rain, rain, go away

February 7 – Rainy day

What a winter this has been so far! We had a small snow storm just before Christmas and knew that we NEEDED to get our mudroom built. The day after Christmas, we started building it. We got the roof on just before the next bigger snow on January 4th. And we’ve had back-to-back snow and rain systems since then. In fact, as I sit here typing this, it is pouring outside. We’re supposed to get about 15% of our  yearly rainfall in this one storm. And we’ve already gotten over half in the last month alone. The bigger mountains around us have the most snow anyone living there has ever seen. What a blessing that mudroom has been.

January 5 – got the roof on just in time for the next snowstorm

Since the push to get the roof on, we’ve slowly been finishing up as we have time and inclination.

January 6 – enclosing the last bit of wall section. I always was a monkey.

January 6 – the fun-ness of construction in the winter – scraping ice off your materials

January 9 – the snow is gone, the rains have come. Time to add the gutter and rain barrels.

January 13 – oh look, more snow. And the beginnings of a door for the mudroom.

January 17 – still snowy – working on a floor for the mudroom

January 17 – mudroom floor before. At least when I was doing this project, the ground was mostly frozen, not the gushy quagmire it had been.

January 17 – mudroom floor after. We used heavy duty shipping pallets we found on Craiglist.

Once the floor was in, the mudroom was just about completed. It took us three weeks to build something that should have only taken one. But that’s construction in the winter for ya. The Hubby is toying around with a small wood stove to put in there so that on days like today (rain, rain, rain), we have a place to dry things out if need be. But even without a woodstove in there, it’s so very nice to have a place to kick off your wet and/or muddy shoes before coming in the trailer. It also keeps our fridge protected from the elements.

January 23 – speaking of the elements…more snow! There are three more solar panels under there somewhere.

We had a few days of warmer and drier weather over the past week and were able to get a few other projects done.

January 30 – sunshine! A beautiful day to clean out the chicken coop.

February 4 – more sunshine (but very windy) – finally built some steps into the hillside between Pajii’s trailer and ours. That will come in handy the next time it’s covered in snow. Slipping and sliding is fun when sledding, not so much when carrying dinner to your father-in-law’s house.

February 6 – despite the bone chilling wind (45mph), Princess Girl and I put up a fence around the rabbit hutch to keep the neighbor dogs out. Just glad it wasn’t raining like today.

So, at the rate this winter is going, it’s looking like things won’t dry out till March or possibly April. Hopefully no longer than that. In the meantime, we are planning and dreaming and looking forward to the day we can start construction on our house. 

And on days like today, when my plans for the day were ruined because of the rain, I see it as time to relax, and catch up on other projects that get put off too often. You know, like dishes. 😉

I hope you enjoy your day, no matter what the weather is where you are.

Adding on and making room

We have an addition to the family. At least for a few months. Meet our godson, Raven Boy.

He’s 13 years old, can drive a vehicle, is great with electronics and tools, and is a ginormous help around the homestead. He and his family visited for the summer, and when his family went home, it was decided that he would stay here with us for a while to help out with building the house and other projects. 

So, as I looked around our trailer, I realized we didn’t have enough room for another full sized person to sit anywhere when we’re hanging out inside. (He has a separate “bedroom”in our extra trailer that we use as storage.)  And with winter approaching, spending all our time outside isn’t going to be an option for too much longer.

So, Hubby and I had a talk, and figured out that with a little bit of rearranging in the living room, we could build a bench to comfortably seat another person or two. And it wouldn’t take up any more space than was currently being used.

I forgot to get a before picture with all our stuff there, but here’s the area cleared out. We had Scooter’s kennel, a couple of file boxes, and the toy chest in this corner.


We cleared out and cleaned the floor. Then started building the frame for the bench. This is where Raven Boy really shined. He already knows so much about using tools, etc that he cut all the wood for the bench, as well as helped put it all together.


Once the frame was together, and the door in for Scooter’s cubby, we covered most of it in plywood.


The left side was left open and put on hinges so that we can lift it out of the way and still deploy our couch into a bed. It was Raven Boy who came up with the design for that section.


We also left the top plywood unattached on the right side in order to easily access the area underneath for storage (and to be able to clean out the dog cubby when needed).


We bought pillows and pillowcases as the cushions for the bench. And we downsized Flower Girl’s toys to fit in a small tote and put the rest of them and the family heirloom toy chest into the storage unit.


I plan on painting the bench and sewing up the ends of the pillow cases so they look a bit more like cushions.

Overall, though, I’m very pleased with it. And since the weather has cooled off considerably recently, it’s been nice that the five of us can sit comfortably in our living room. We can also go over to Pagee’s (now spelled Pajii) trailer to watch a movie or something.

And Pajii put the full dinette back in his trailer after Bachan passed away, and all 6 of us can sit around the dining table when the weather (or yellowjackets) is not conducive to eating outside.

So that’s one more thing checked off our list of things to do to in order to live comfortably in the trailers for the winter. Next up is heat! Pajii’s trailer has a working furnace. Ours does not. We have several ideas of how not to freeze over the winter. I’ll keep you up to date on what we come up with.

We’re HOME!

I have said it before, and I’ll say it again. I’m a terrible blogger.

Here we’ve been moved onto the Homestead for 10 days and I have yet to blog about it. Ya’ll were probably wondering what happened to us.

Well, we’re here. We’re happy. And we’re tired!

Bachan and Pagee are all settled in. We still have a few systems to set in place for them to make it for the next year or so comfortably. But, for now, they are doing good.

The Hubby and girls and I are still roughing it as we get our trailer situated and figure out our utilities. It’s been 10 days and we still don’t have all of our stuff unpacked. Seems we collected quite a lot while living in Oregon. I tell ya, the more space you have, the more stuff you collect to fill that space!

And on top of all that, our trailer was used as storage for the two years we were gone. I think we’ve pretty much gotten all the extra stuff out now (finally) so now it’s just figuring out how to put away everything!

image

We’ve also been busy setting up our outdoor living area. It rained the first week we were here (did Nevada want Bachan and Pagee to feel at home or something??), and now it’ turned off hot, so we needed to get our shade shelter up.

image

But even when I had to stop and find a spot that gets good cell signal so I could get some office work done, there hasn’t been one moment I haven’t been glad to be back.

image

So that’s just a quick update. I have quite a few blog posts to write about our experience so far. Now that Hubs has gotten a good phone charging station set up in our trailer and I’m no longer having to charge my phone in the van, I feel like I can use my phone to blog more often.

I also figured out that I can write the post offline and let it upload whenever I get enough signal. Duh!

So yeah, we’re home. It’s going to be a long journey till we’re settled in our house, but we’re here. And that’s what matters.

And we’re so glad you’re following along on the adventure with us!

Maridy

“I lift up my eyes to the hills, where does my help come from? My help comes from the Lord, the maker of heaven and earth.” Psalm 121